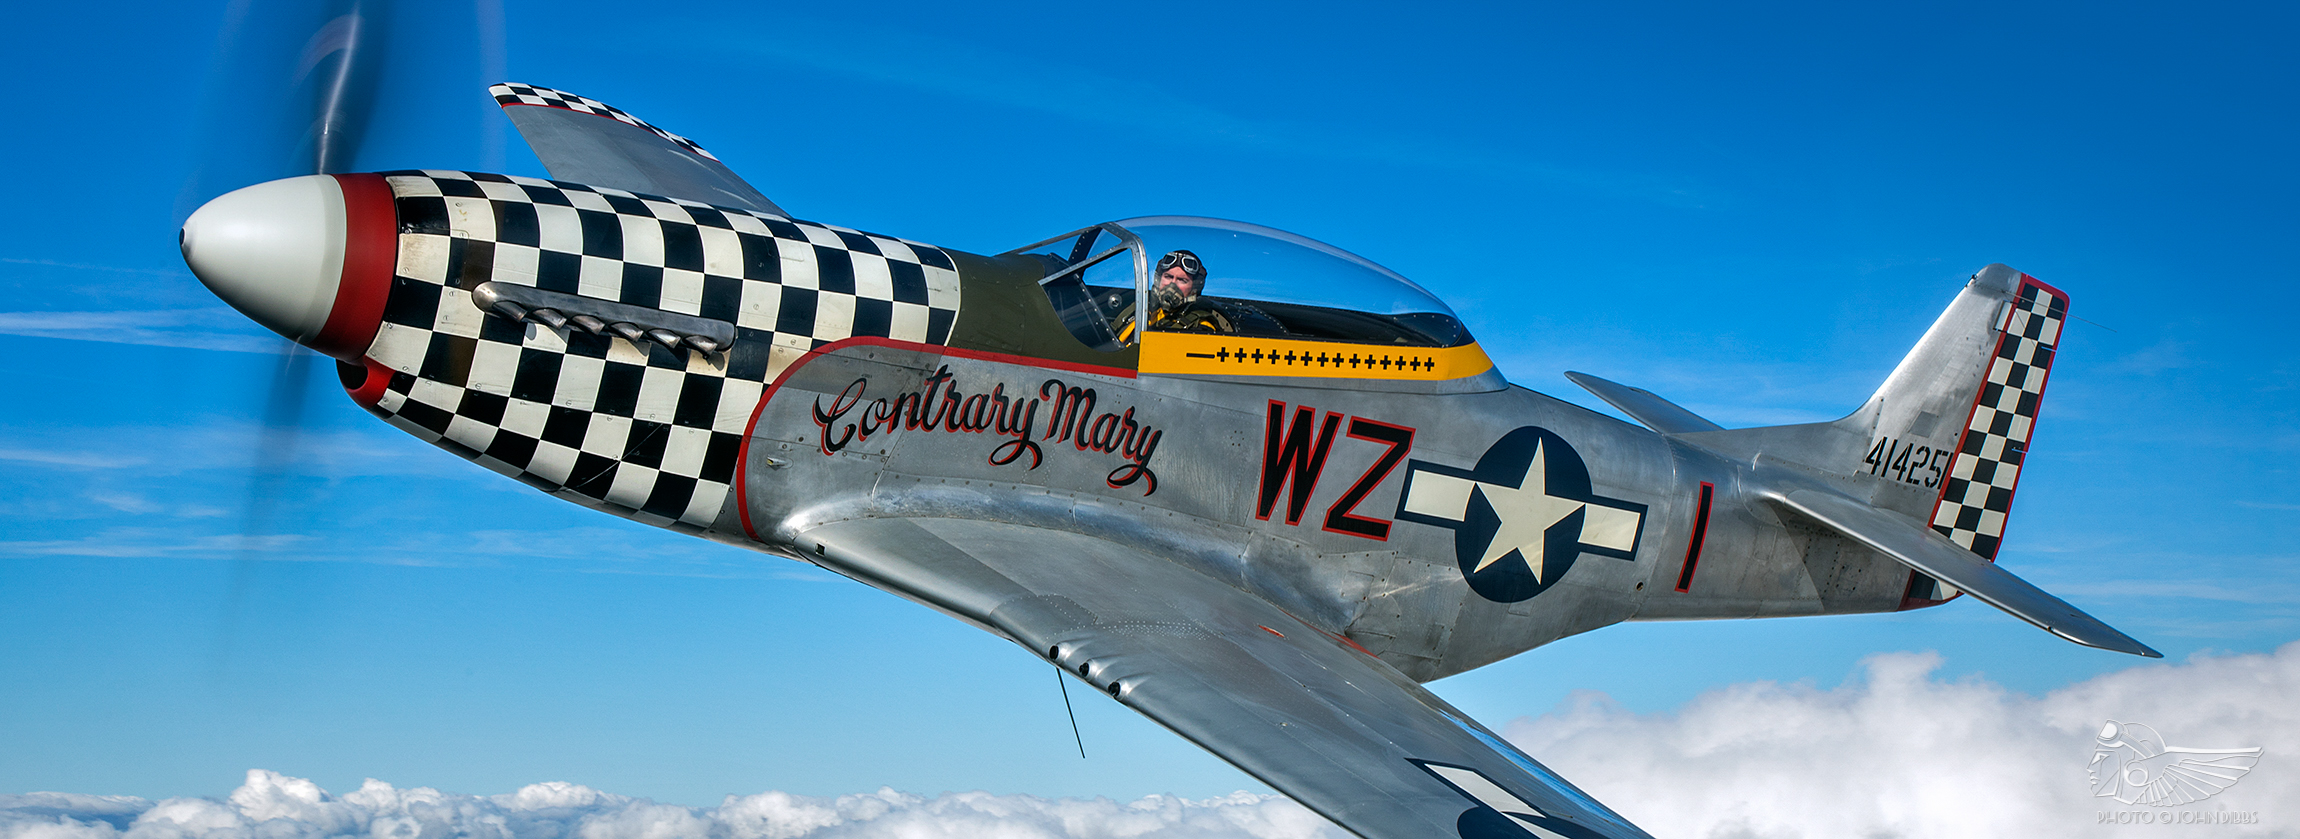

It’s always exciting to get a ‘new project’ e-mail pop in to the inbox and this time it was from Air Leasing boss Richard Grace asking us to prepare for a re-paint of the North American TF-51D Mustang G-TFSI (formerly known as Miss Velma), a dual control training version of the famous fighter. Having carried out a number of projects over the years with Air Leasing, commencing with the completion of Seafire III PP972 and more recently the re-finish of P-47 Thunderbolt Nellie B, we had established an excellent working relationship. Richard was straight to the point and told me that the aircraft owner had already selected the fairly well-known Duxford based 78th Fighter Group scheme – Contrary Mary. This made a lot of sense as his aircraft do spend a lot of time at the historic airfield and although there had been a US-based Contrary Mary scheme a number of years ago it would be a completely new identity in contrast to the previous scheme and not previously seen in the UK. The original Contrary Mary was a single-seat P-51D, allocated to the 84th Fighter Squadron and was the personal aircraft of Lt. Col Roy Caviness.
This was early 2018 and at the time the aircraft was in the USA undergoing repairs following an off field wheels-up landing which had occurred during the Flying Legends 2017 airshow. It was hoped that the aircraft would be shipped back to Air Leasing’s Sywell base and be re-assembled and painted in the new colour scheme in time to appear in the 2018 show.
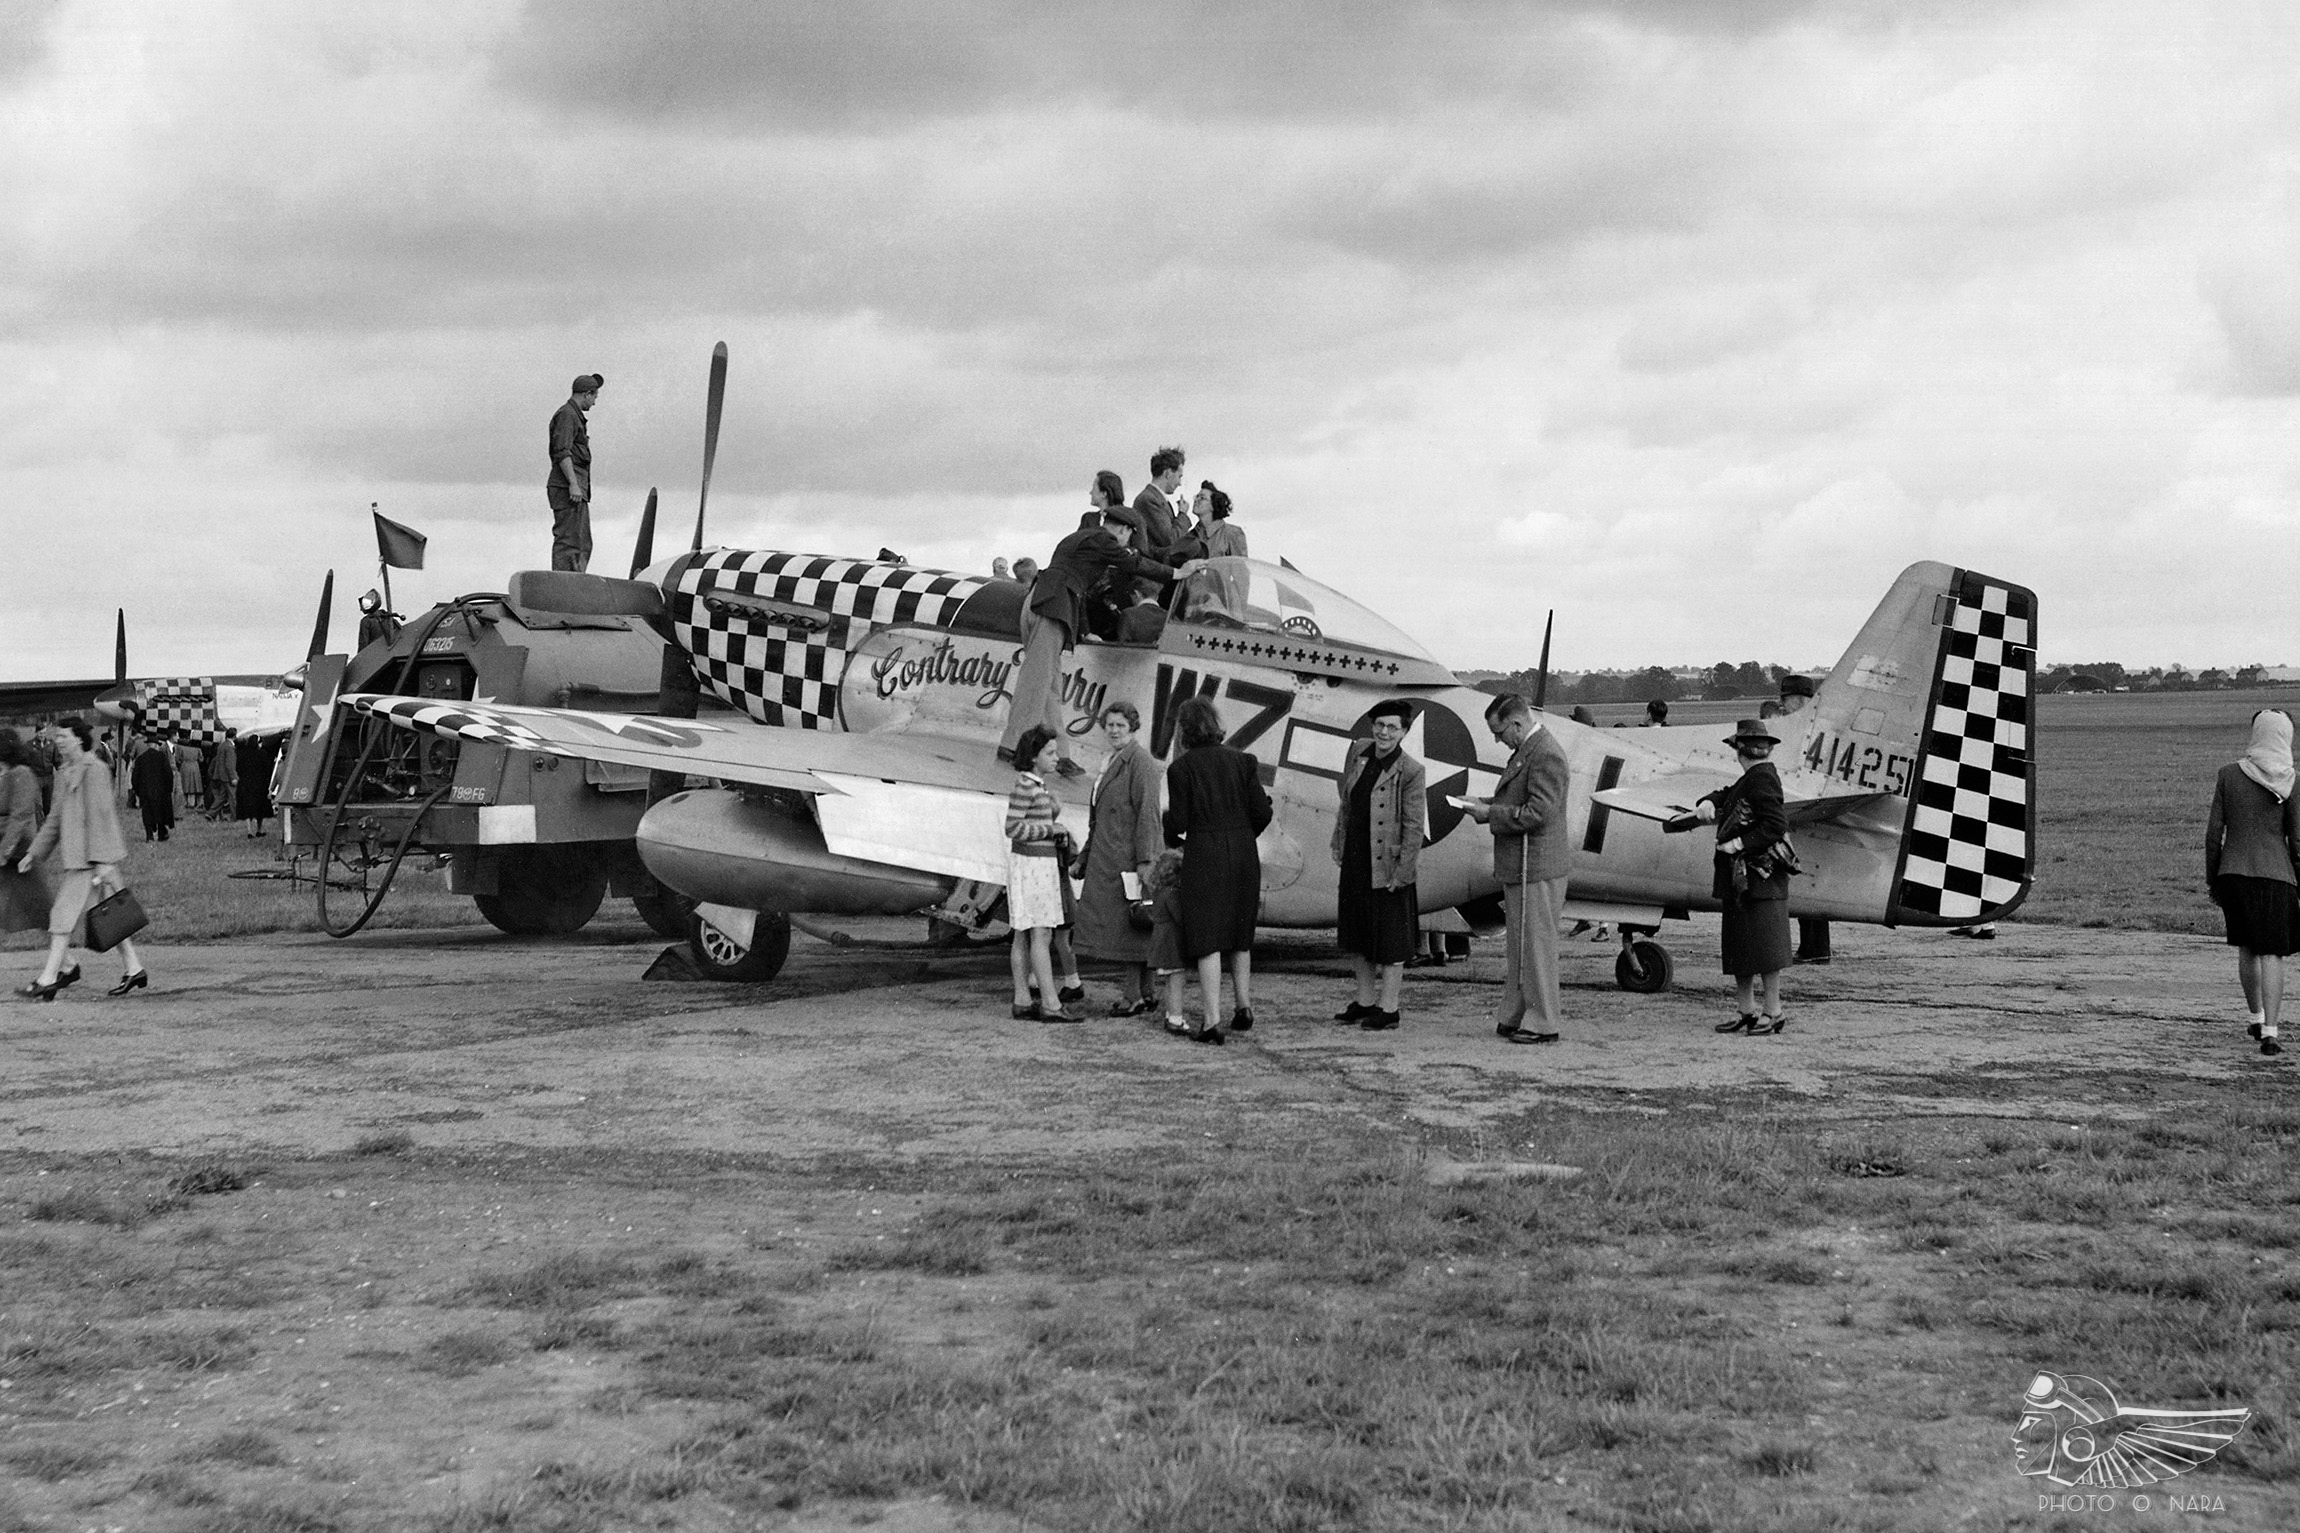
At Warbird Colour our normal service is initially to offer potential paint scheme choices to the owner – but in some cases, this being one such example, it’s already chosen so we were straight in to the second phase, specific scheme research. This normally starts on the internet before cross referencing to books held in the company library, and it soon became clear that the well-known ground shot was in fact the only photo available of this particular machine – taken in the summer of 1945 at Duxford during an airfield open day. It was possible to source a fairly high definition version of the photo online so we were satisfied that we had enough information to proceed with the preparation of the artwork for the markings and insignia.
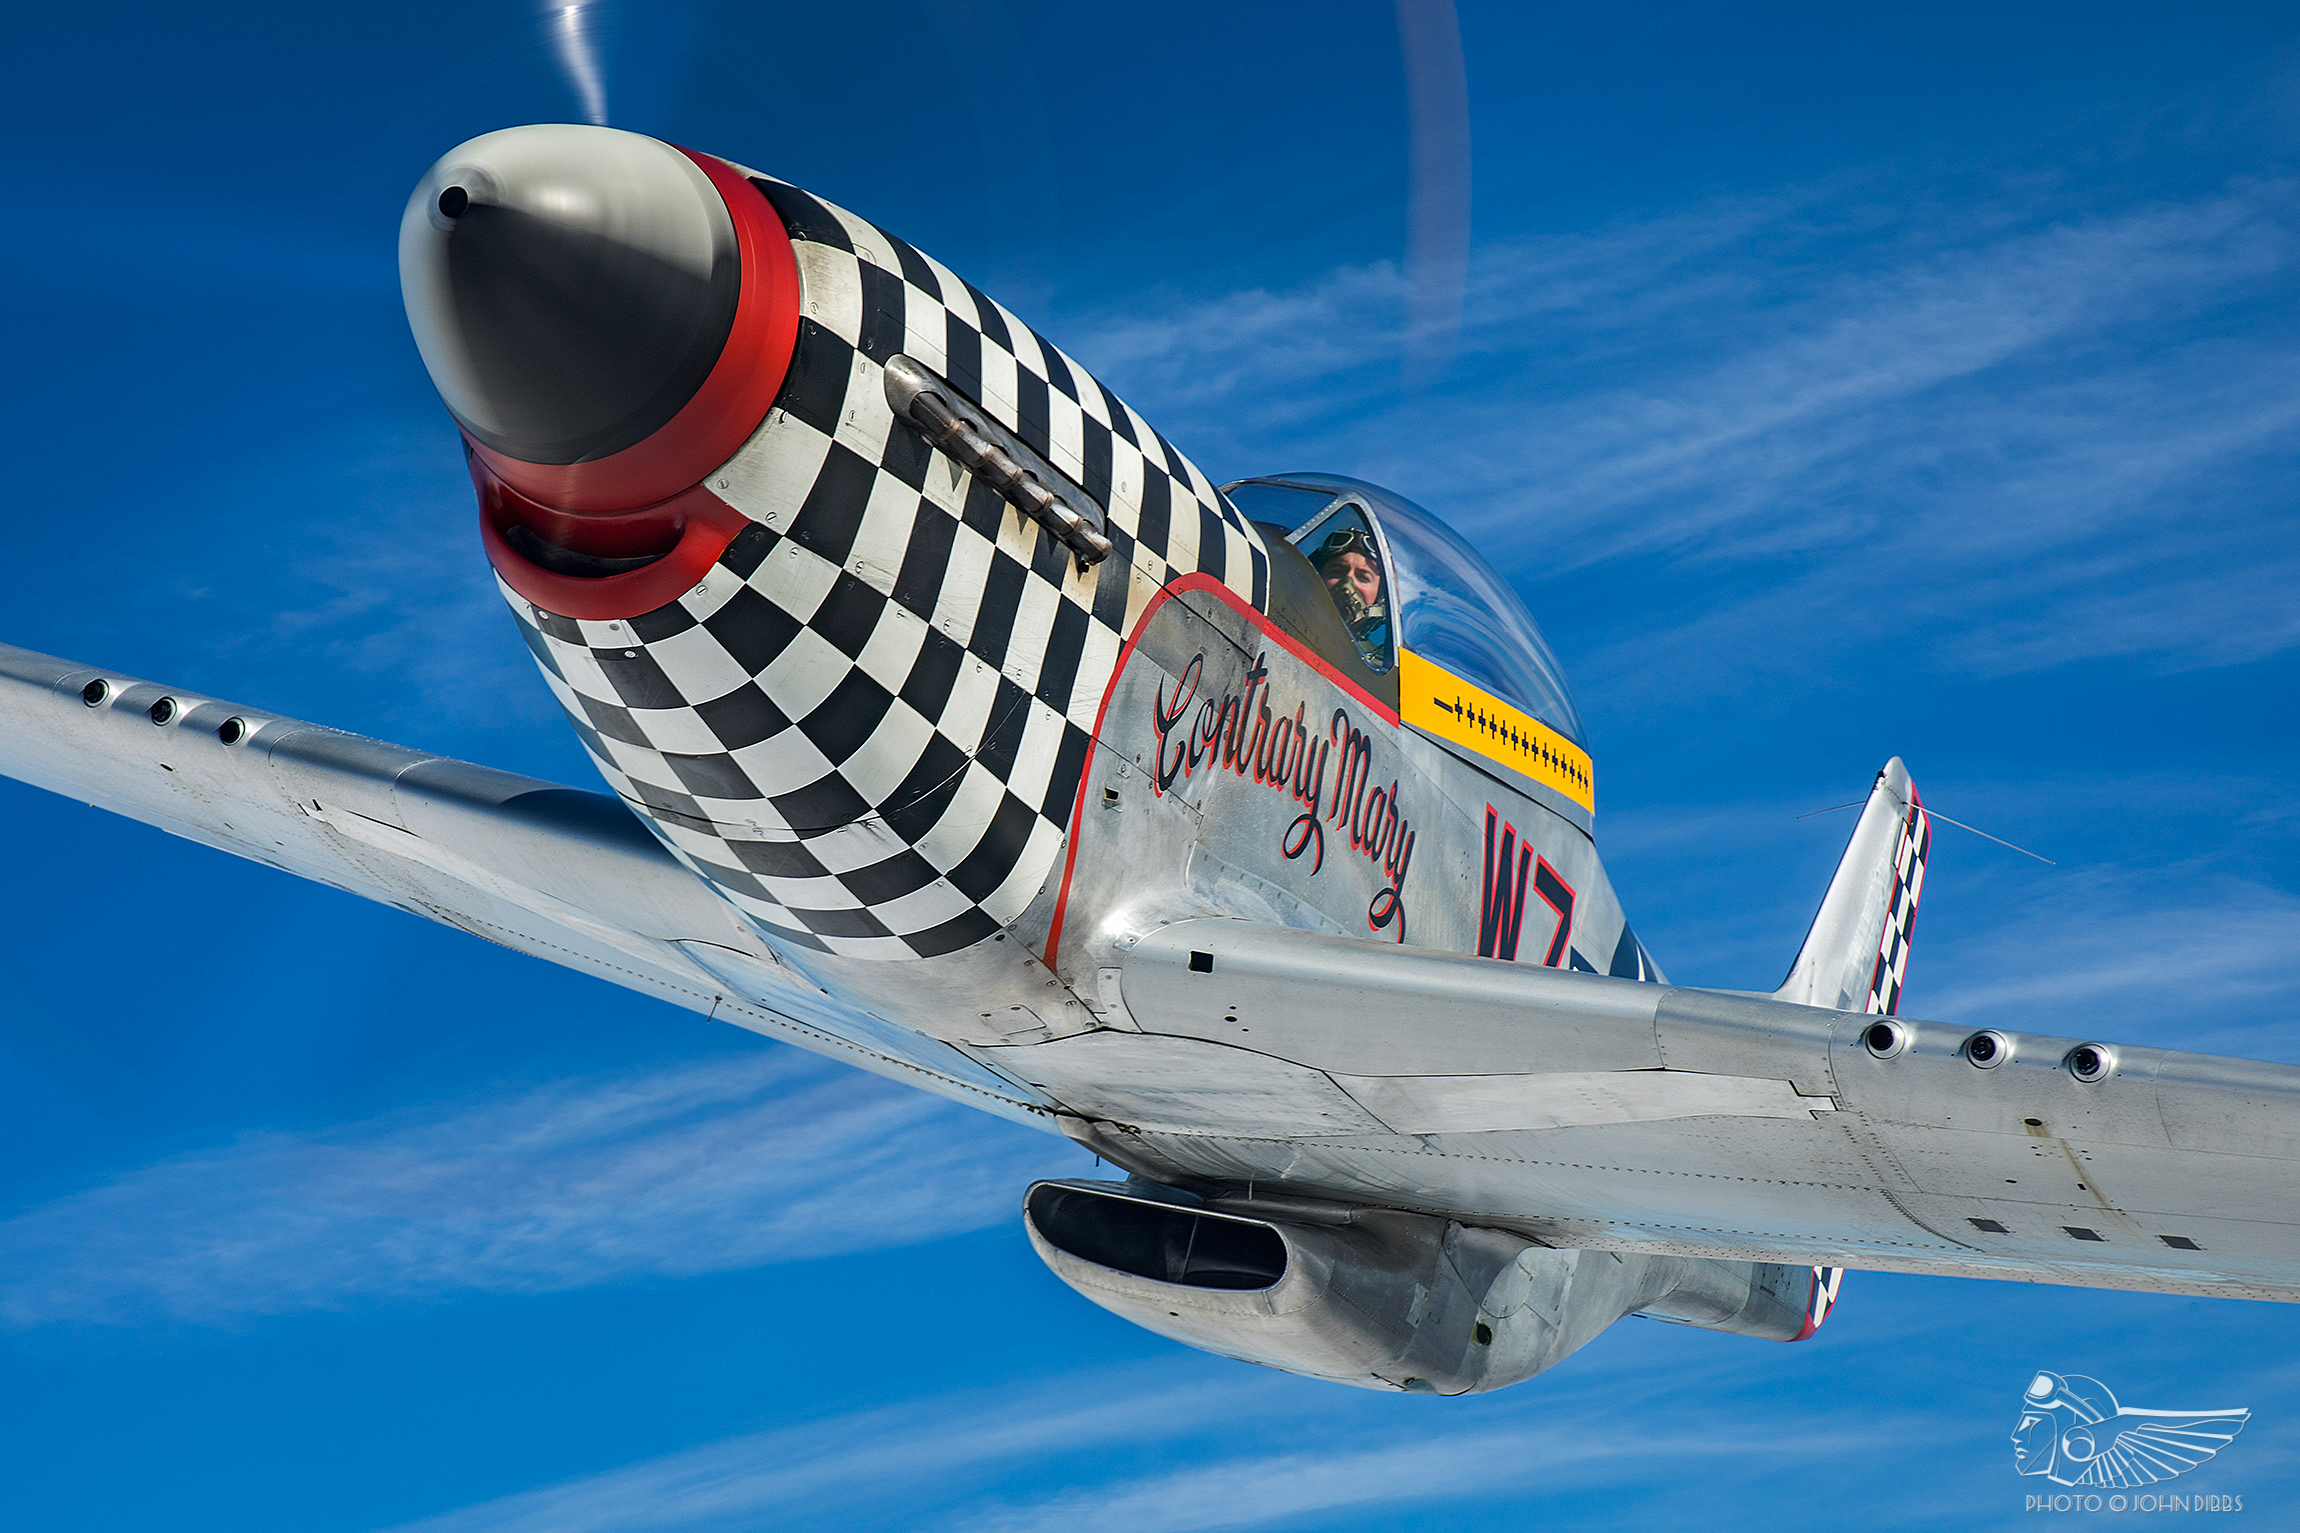
The most obvious characteristic of the 78th FG’s late wartime P-51s was the proliferation of black and white chequers, both on the nose and often also on the wingtips and rudders. We had been involved in an earlier 78th scheme, some years before and the chequers in that instance were confined to the nose and so this one was going to require a fair bit of extra work. We were also aware that no two 78th machines exhibited the exact same chequer pattern so very close examination of the photo was going to be the key to getting this one right.
As the aircraft was still overseas and would only arrive a month or so before the show we knew we would all be under pressure once the container arrived at Sywell (not least the Air Leasing engineering team who had to put her back together!). We therefore decided to carry out as much advanced preparation work as we could and to create pre-cut paint masks for the larger markings and also at least some of the chequers, to speed up the application process. We normally use vinyl masks for general markings, serial numbers and national insignia in conjunction with the ‘old school’ manual lining tape method, so long as they are a fixed size as once cut there is very little scope for adjustment. The pre-cut masks start life on our CAD system as full size line drawings and are usually sourced from the original manufacturer’s factory paint application drawings. Code letters, which were always field applied, are done by reference to period photos and sized and located using the national insignia they sit next to, as a benchmark.
Once the CAD drawings are complete they are emailed to our vinyl specialist who then cuts them in to a special paint mask vinyl material using a computer driven plotter/cutter. This process gives a high degree of control over the size and details of the finished markings and they can also be easily adjusted or even printed on to paper if trial applications are needed. Fortunately, the P-51 Mustang has comprehensive and very detailed surviving factory drawings for the national insignia and applied markings so that aspect did not present a problem (we subscribe to the superb US based Air Corps Aviation library database for access to this information).
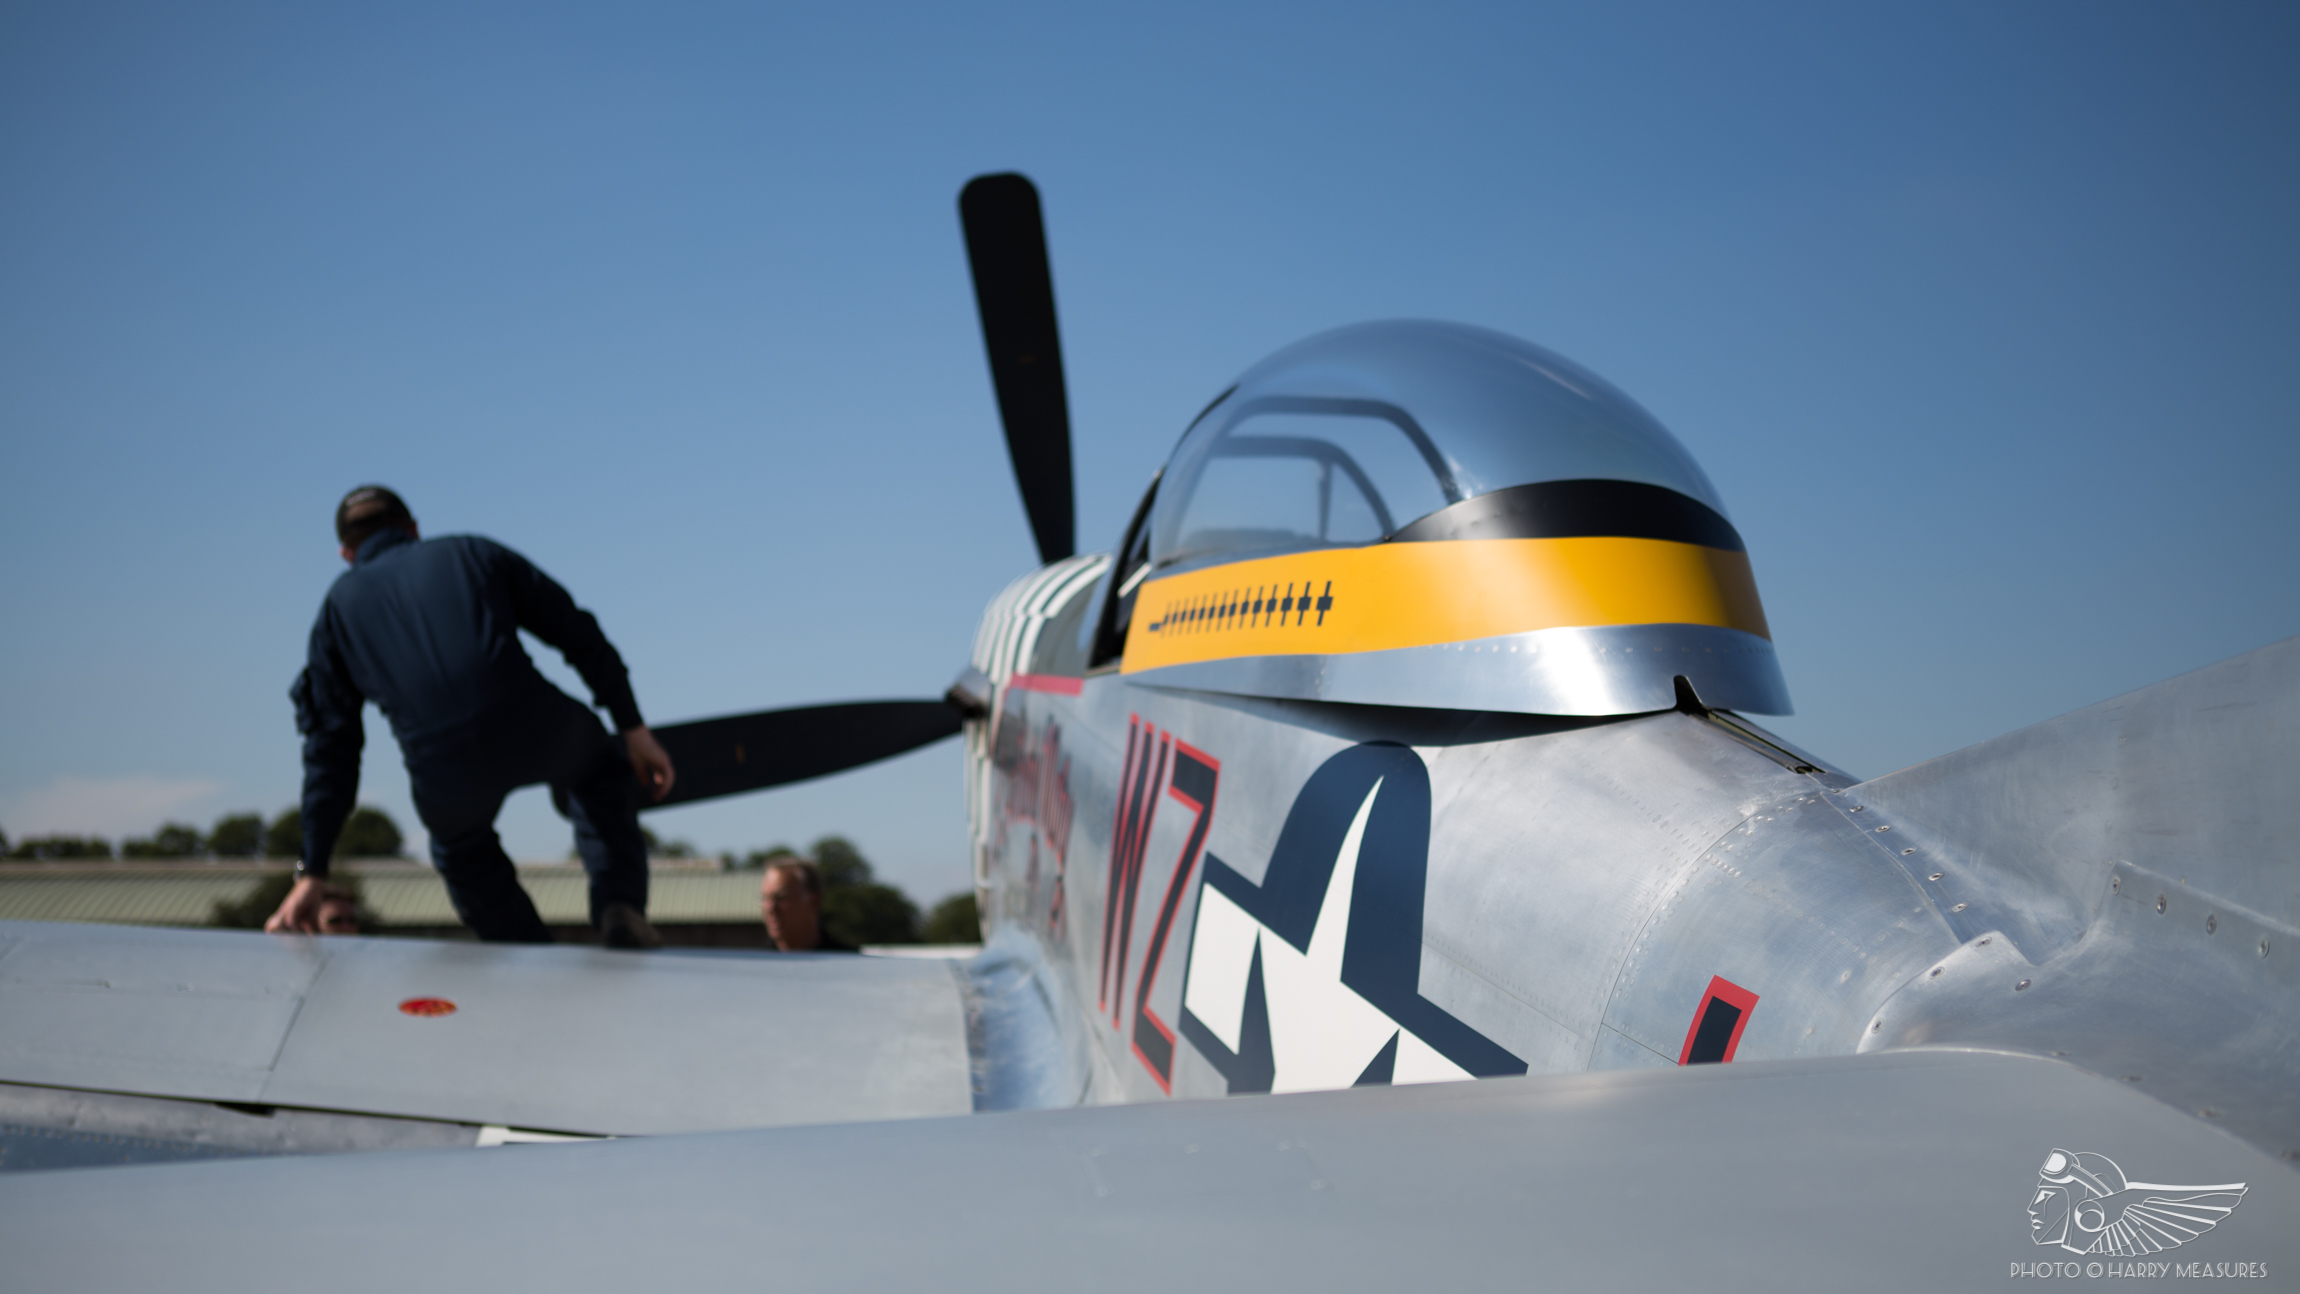
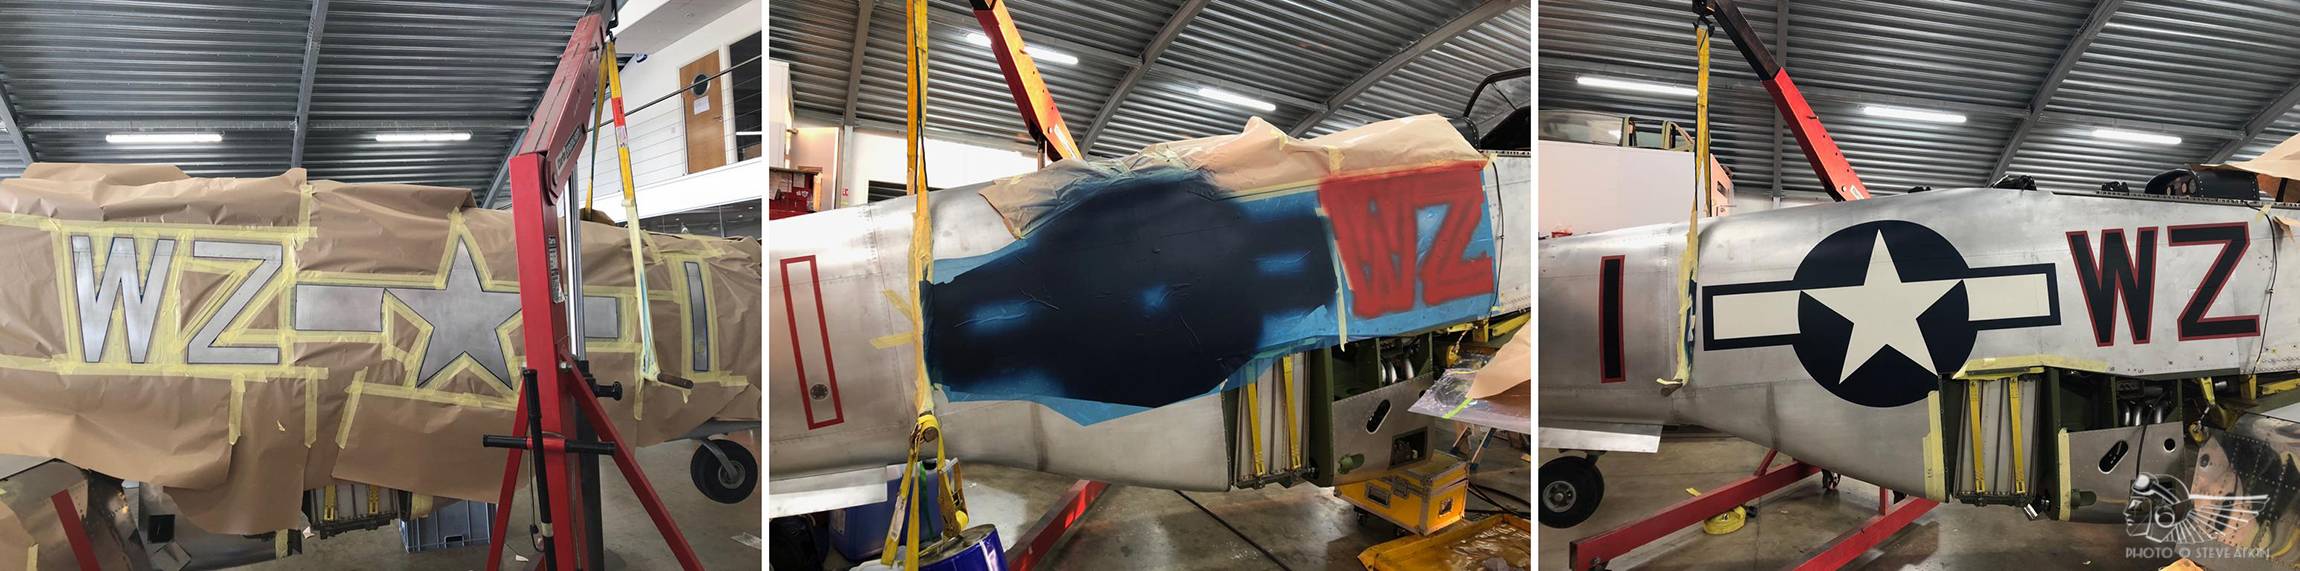
We then added the WZ-I code letters, sized and proportioned by reference to the period photo and the fuselage ‘Stars and Bars’. With the field applied chequer markings covering the rudder the USAAF ground crews had to have re-painted the aircraft ‘414251’ serial number, by hand, on the fin in a condensed format (normally the six numbers straddle the fin and rudder and were applied in a ‘font’ unique to North American Aviation). They had obviously retained the height of the serials – the standard 8″, but they had squeezed the numbers together to get them to fit in the limited space on the P-51 fin. We always spend a lot of time at the computer trying to get this kind of detail right and this was no exception as each digit was hand done rather than a standard stencil.
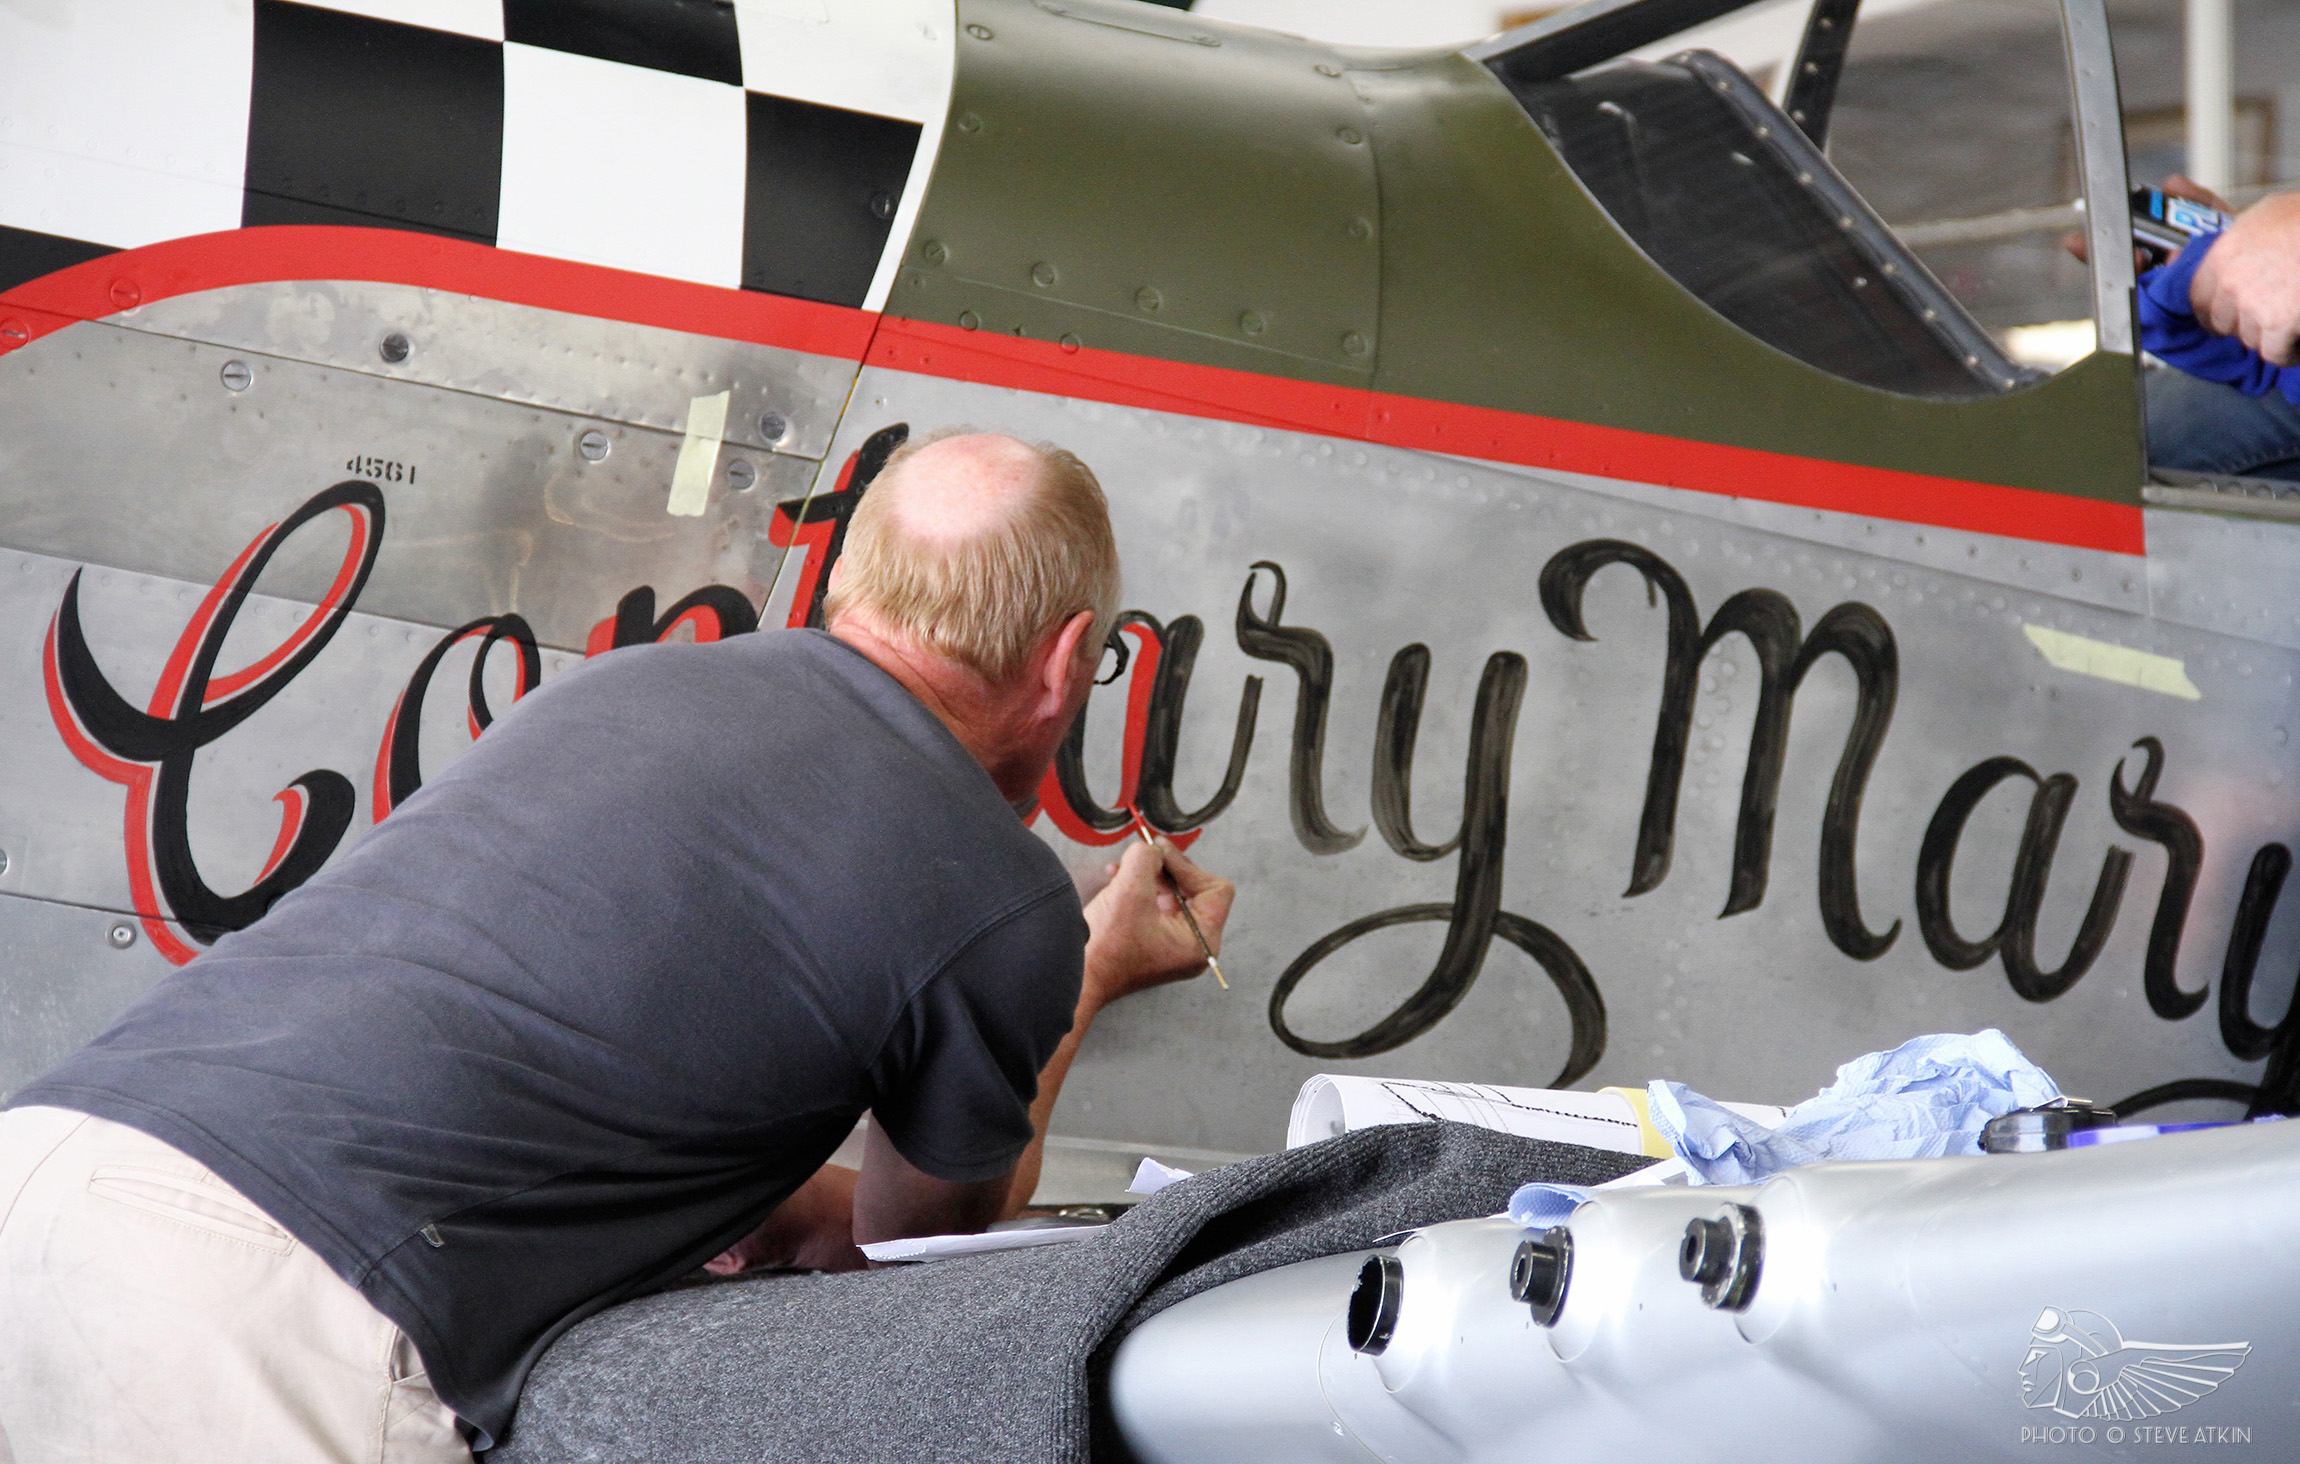
We made the decision, fairly early on, to hand paint the Contrary Mary name on the fuselage exactly as it was done in period. My colleague, Alec Kinane, is a real talent when it comes to this part of the project so I usually furnish him with the best photos I can find, agree some overall dimensional references and colours and let him get on with it. However, it was always very clear that the other key aspects to this scheme, the nose, wingtip and rudder would need a lot of time spent on them to ensure the finished scheme was an exact reproduction of the period photo. In the absence of the subject aircraft which was still in the USA at that time, we used another Mustang to take some key dimensions and then drew a full size CAD profile of the rudder.
The next step was, again, peering very closely at the period photo on the computer screen to figure out exactly where the lines of the chequers were in relation to key visual points such as the trim tab recess and bolt access holes. The red border around the rudder was also a prominent feature and Alec pointed out to me that the forward vertical edge was actually painted on the fin. Its this sort of careful observation that makes a scheme and with that deduced we completed the CAD drawing for the port side of the rudder as per the photo. One of the great advantages of CAD is that with a couple of mouse clicks you can get an almost instant mirror image or repeat of a marking and so we were able to draw up both sides of the rudder and send the files off to our vinyl supplier to cut the masks.
Transporting a large object such as a P-51 shipped across the Atlantic almost inevitably results in delays and this case was no exception. So with just a few short weeks before Flying Legends 2018 the container finally arrived at Sywell. The wing was beautifully restored with the highest level of detail and attention to internal colouration and stencils. It had been left in bare metal so the first task was to mask and prepare the wing for priming and a top coat of dull silver. The whole team usually comes together to achieve these big tasks and in an day or so the wing was positioned in to Air Leasing’s dedicated spray booth, prepared, masked and ready for paint. We had agreed that Steve Kingman, Air Leasing’s highly experienced Deputy Chief Engineer would concentrate on getting the silver paint on the wing while myself and Alec applied our efforts to the detailed markings. We usually split the work in a similar way with the Air Leasing projects, for example with Steve painting the fuselage and us the wings, or the other way around, in order to save overall project time.
Once the wing was in the spray shop we were able to get on with the other parts of the airframe, starting with the distinctive Identification Yellow cockpit canopy framing and 14 ‘victory’ markings – the latter having also been drawn out in CAD and cut in to pre-prepared paint masks thus saving time. Richard Grace was concerned that the size of the TF-51 cockpit canopy, being significantly larger than the standard version, would be further emphasised by the yellow framing and he suggested that we make the yellow area the same thickness as a standard single-seat canopy frame and infill the small section at the rear in black – this proved to be an excellent idea and the finished effect is to actually reduce the visual bulk of the canopy.
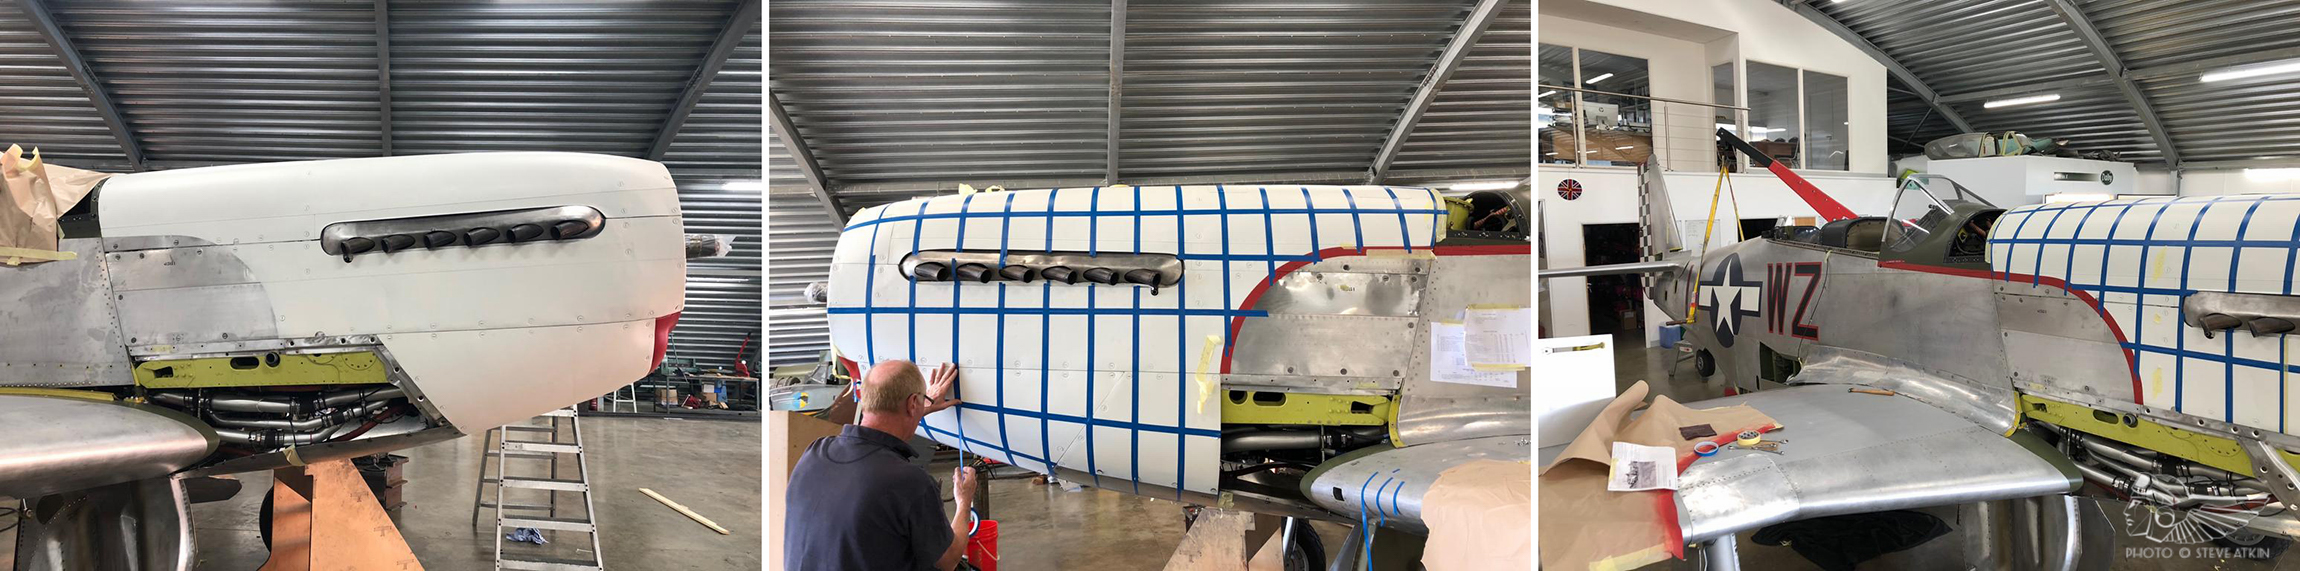
With the wing out of the spray shop and looking resplendent in a factory standard flat silver finish we were able to turn our attention to the two ‘Stars and Bars’ symbols and these were applied with the wing still in its vertical support fixture (much easier for access). We also took the opportunity to paint the wing tips in white in preparation for the chequer markings which were to be applied later. By this time the aircraft assembly work was moving on apace with the engine plumbing almost completed and the cowling support rails in place, so we slaved on the engine cowling panels in order to plot out the distinctive red border which separates the bare metal fuselage and the black and white chequered nose. With this done, we were able to remove the cowlings and get them in to the spray booth to be prepped, primed and top coated in Insignia White and then return immediately to the fuselage to paint the rear part of the red band and the Olive Drab anti-glare panel in front of the windscreen.
At this stage, I will add a quick note on the preparation needed for painting as this is, like any work involving paint coating application, an essential aspect. An initial thorough clean off followed by removal of any remaining grease or contaminants is followed by a light application of key abrasion and this is carried out manually in the traditional manner. Once a perfectly clean surface is achieved paint can be applied to the bare metal surface. The general industry standard is to apply a base wash primer containing chromium to prevent ‘filiform’ corrosion (this gives a distinctive golden brown finish), followed by a yellow chromated epoxy base primer. These two coatings in combination, provide an anti-corrosive treatment and also act as a base for the colour top coats. Both are 2-part (2 pack) products which require mixing with a designated catalyst before application by spraygun and both are fairly hazardous materials requiring protective clothing and appropriate respitory equipment. Air Leasing has a superb dedicated spray booth in the hangar which provides filtered air extract and excellent lighting and this provided the best possible conditions for paint application. Our top coat paint is supplied by Leonard Brooks of Harlow and consists of 2-pack polyurethane paints which are hand tinted to our colour references. In the case of US schemes such as this one, we use the Monogram paint chip book which is generally considered to be the most accurate source of period US colours.
Back to Contrary Mary – at this point our pre-project preparation work started to pay off and having also prepared and sprayed the rudder white and set out the red border with lining tape, we were then able to apply the pre-cut chequer masks and spray the masked area in black. This really saved a lot of time but we knew we were going to need it for the wingtips and nose later on in the project.
By now we had spent around four days on the project, and the subsequent few days were used to set out, mask and paint the fuselage national insignia and WZ-I code letters. The latter was done in distinctive black letters outlined in red which was very eye-catching but requires more work to achieve compared with single colour letters. Having created the entire mask in advance (one for each side of the aircraft), the application time was significantly reduced but with four different colours to apply in a small area, with some directly adjacent to each other there is a minimum amount of time that this kind of work takes as reverse masking on to a previously painted surface ideally needs at least 24 hours to elapse. So the first painting session was the application of a wash primer followed by the Insignia Blue for the ‘Stars and Bars’ and the red WZ-I code letter outlines, applied at the same time. They were quite close together in some areas but with careful use of a hand held card mask and a smaller detail spraygun for the red it was achieved in one painting session.
The following day the masks were removed so that the inner white areas of the ‘Stars and Bars’ and inner black areas of the code letters could be reverse masked and sprayed. The reverse masking is done using old fashioned lining tape, masking tape and paper along the pre-defined edges so there is a fair amount of time needed to achieve a perfectly crisp hard edge and ensure there is no bleed through or loose masking. This was left overnight to dry and was good encouragement for an early start the following morning to remove the masking – and I have to say, no matter how many projects you have done, there is always a real sense of satisfaction in peeling off the masking to reveal the final product!
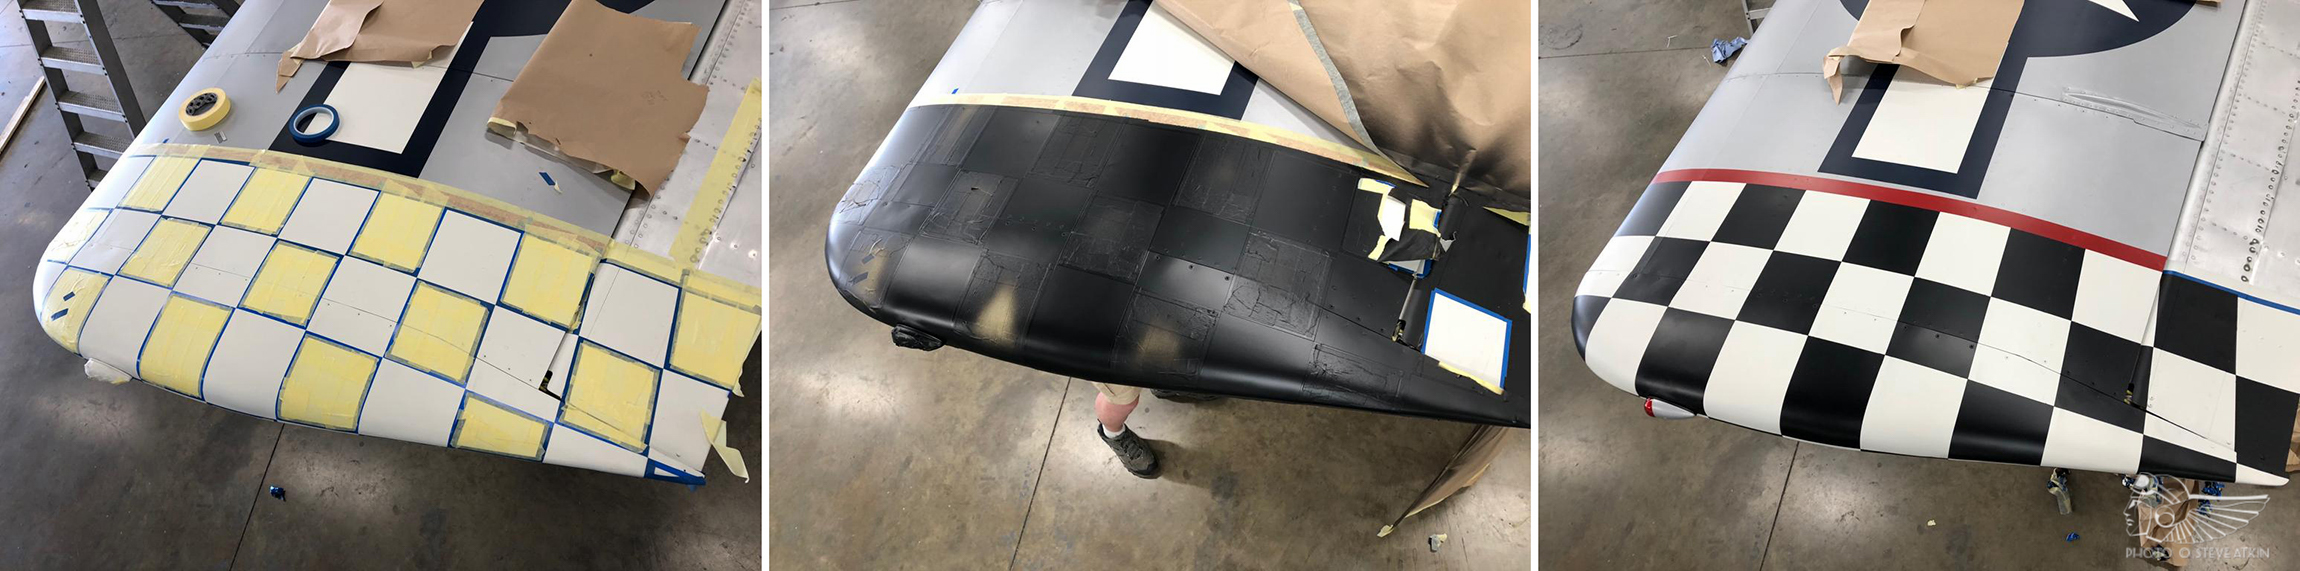
Next task was the wing tips – we had taken the chance to spray the base white area already and also applied the thin red band at the same time as we painted the fuselage code letters. So the final step was to set out the grid lines for the chequers. This required some serious photo gazing and very helpfully John Dibbs had supplied a really beautiful, cleaned up, high resolution version of the Duxford 1945 shot which greatly helped with this task. We could easily see the wingtips were divided in to three rows of squares and had initially assumed it was eight squares long. There were a couple of points where the squares lined up with visible wing features such as the aileron joint – but being cautious we decided to take some measurements and draw up a quick CAD profile of the wingtips on the laptop in the Air Leasing crew room. Dividing the white painted area in to three widths and then dividing it, cordwise, in to eight just did not put the squares in the right places in comparison with the photo. So we erased that attempt and tried it with nine. This had the same result – it just did not look correct at the key visual cue points. So it was then done with ten – and low and behold, all the squares fell perfectly in to place! Thank goodness for CAD technology as it would have taken so much longer to do that with lining tape in a ‘trial and error’ fashion.
So it was then straight out to the aircraft to spend the rest of the morning with lining tape and craft knife in hand setting out the squares to match the CAD layouts. We use a double tape line method for applying masks for the chequers which we first used on the P-47 Thunderbolt, Nellie B, earlier in 2018. This method uses two adjacent lines of 9mm tapes where the actual finished line is the abutment between the two tapes. Once you have your vertical and horizontal double tapes in place you then carefully trim out alternate squares to get the required (in this case white) masked areas and finally fill in with wider masking tape prior to spraying black.
This makes it sound like a quicker job than it was and in reality each wingtip was a long day’s work for one person to achieve the masking – so I am grateful to Alec for stepping in and taking the starboard tip a few hours after I had started work on the port one (and realised how long it was going to take!). We always like to have a plan of work before we start a job but its impossible to be 100% accurate and sometimes jobs that we anticipate as taking a long time are quick to accomplish but often vice versa and I think the wingtips were the worst offenders on this project, but we were very pleased with the finished result.
The following day it was time to commence work on the most distinctive part of this scheme – the black and white chequered nose. Having had a little prior experience of this, a number of years previously, Alec and I were wary of the time it would take and the possibility of messing it up – so we cautiously approached the job on the port side with, once again, enlarged portions of the Dibbs restored photo in hand. There really is no substitute for spending time looking at a period photo to get an idea of how it was originally done. It was clear the groundcrew of Contrary Mary had used cowling panel lines in their scheme, where they could and also were not too fussed if some of the ‘squares’ were not really square at all – in fact very few of them are anywhere near square! The same double tape method was employed (although this time using a lot more tape, necessitating an emergency trip to the local bodyshop supplies shop at a late hour). The lower part of the cowlings was not visible in the period photo so there was always going to be an element of creativity once we got to that stage – however, projecting the average square size around the lower panels at the widest point gave a very satisfactory appearance.
Having picked up the key salient visual points and ensuring our tapes were plumb and vertical, we were then able to transfer over to the starboard side and repeat the process. After being up and down access ladders all day, we decided to cut the tapes at the cowling joint lines and then take the cowlings off and complete the final masking and black paint application in the paint booth. This required careful marking of each panel to confirm which squares were to be left open (for painting black) and which were to be masked (and remain white) as getting that wrong would be a complete disaster! As I had a prior commitment it was left to Alec to complete the tape trimming and mask infilling and apply the black paint finish.
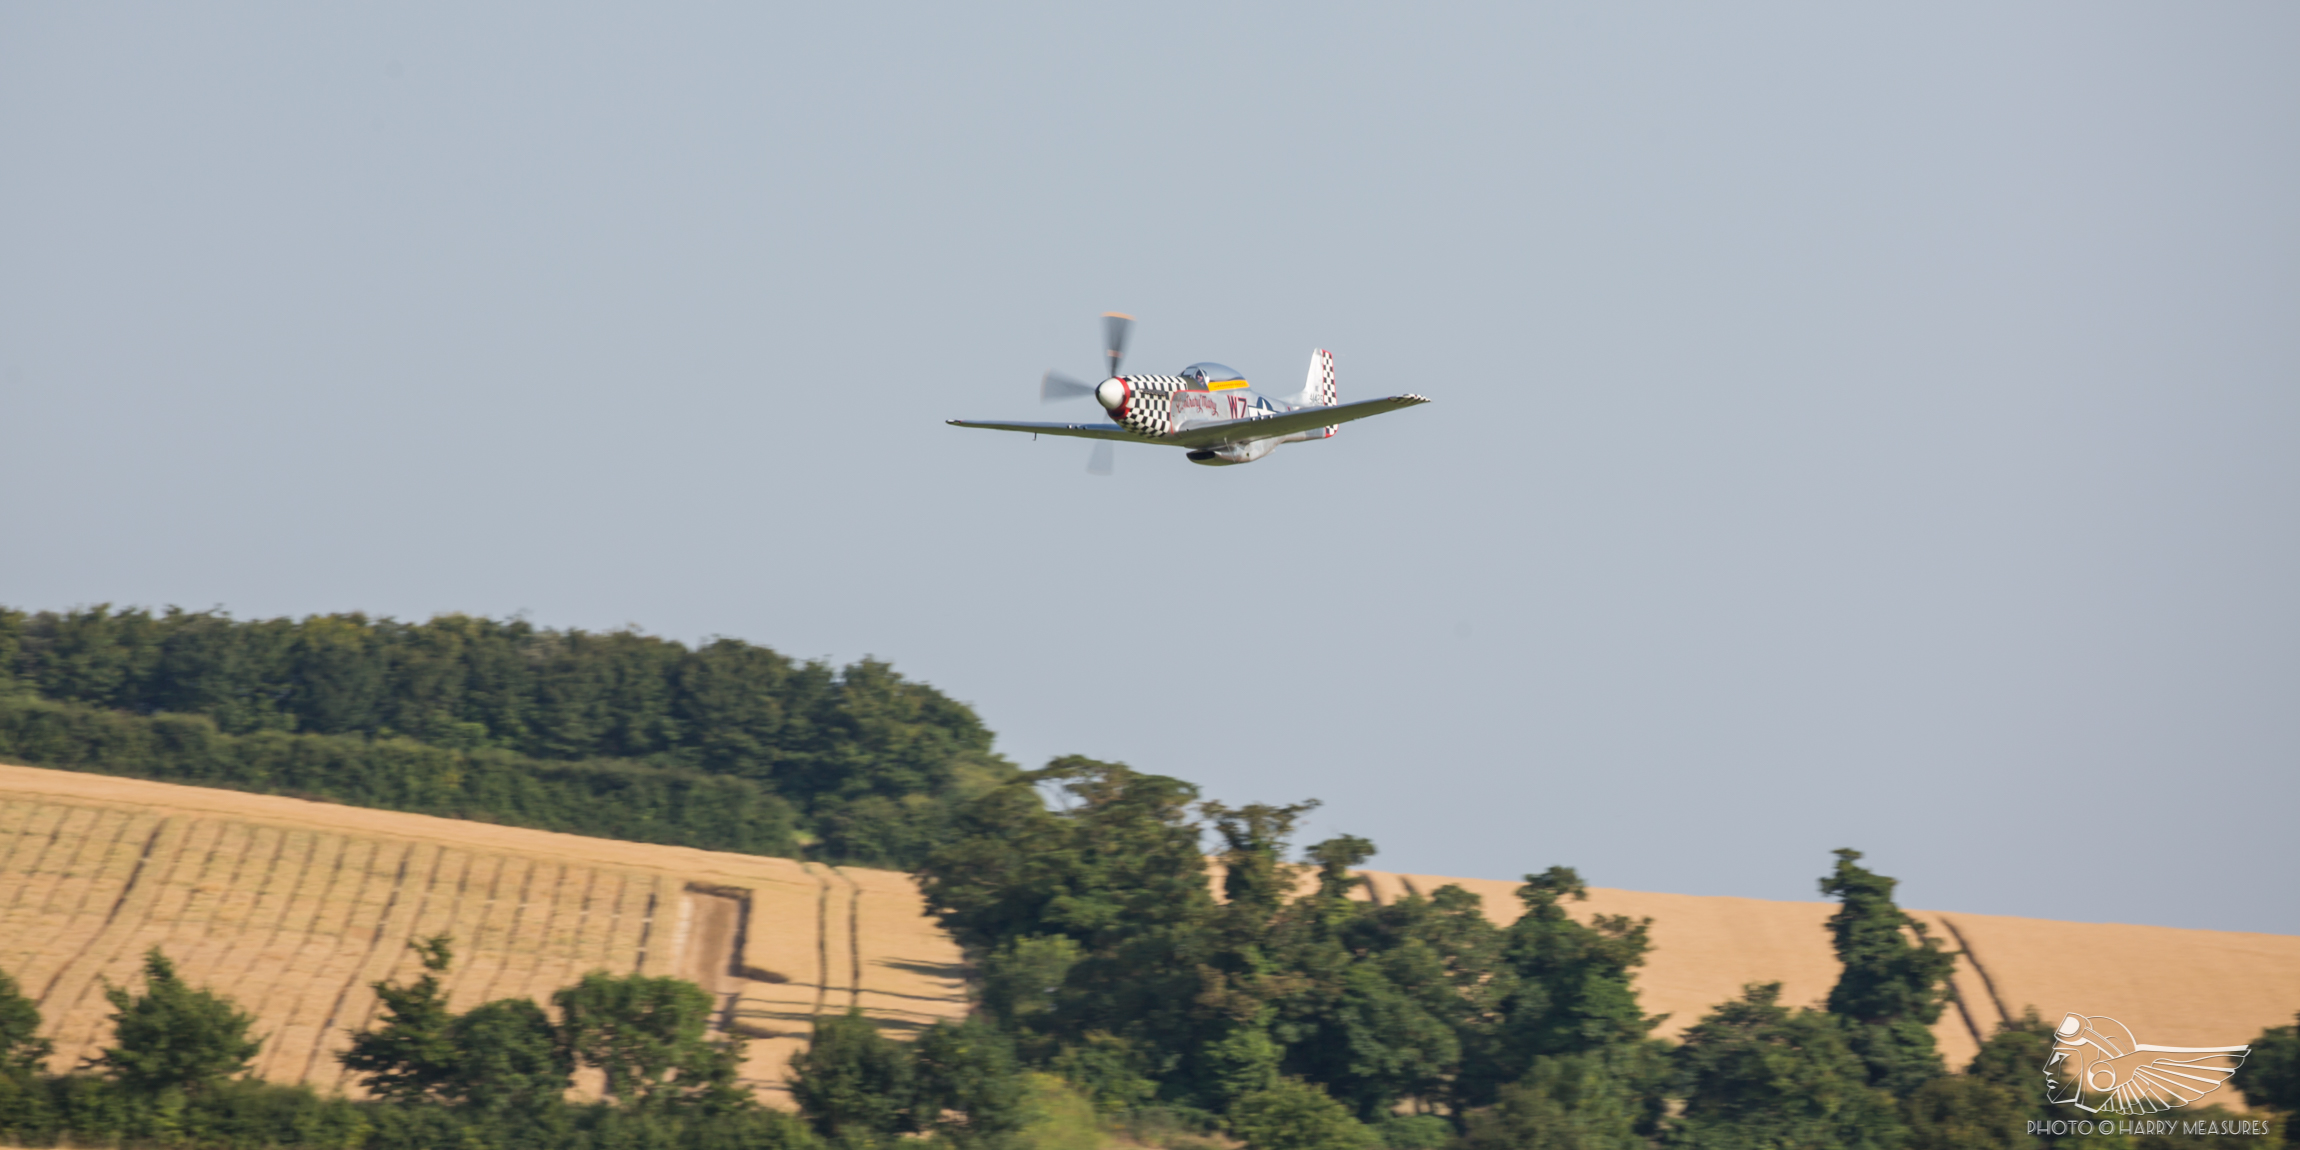
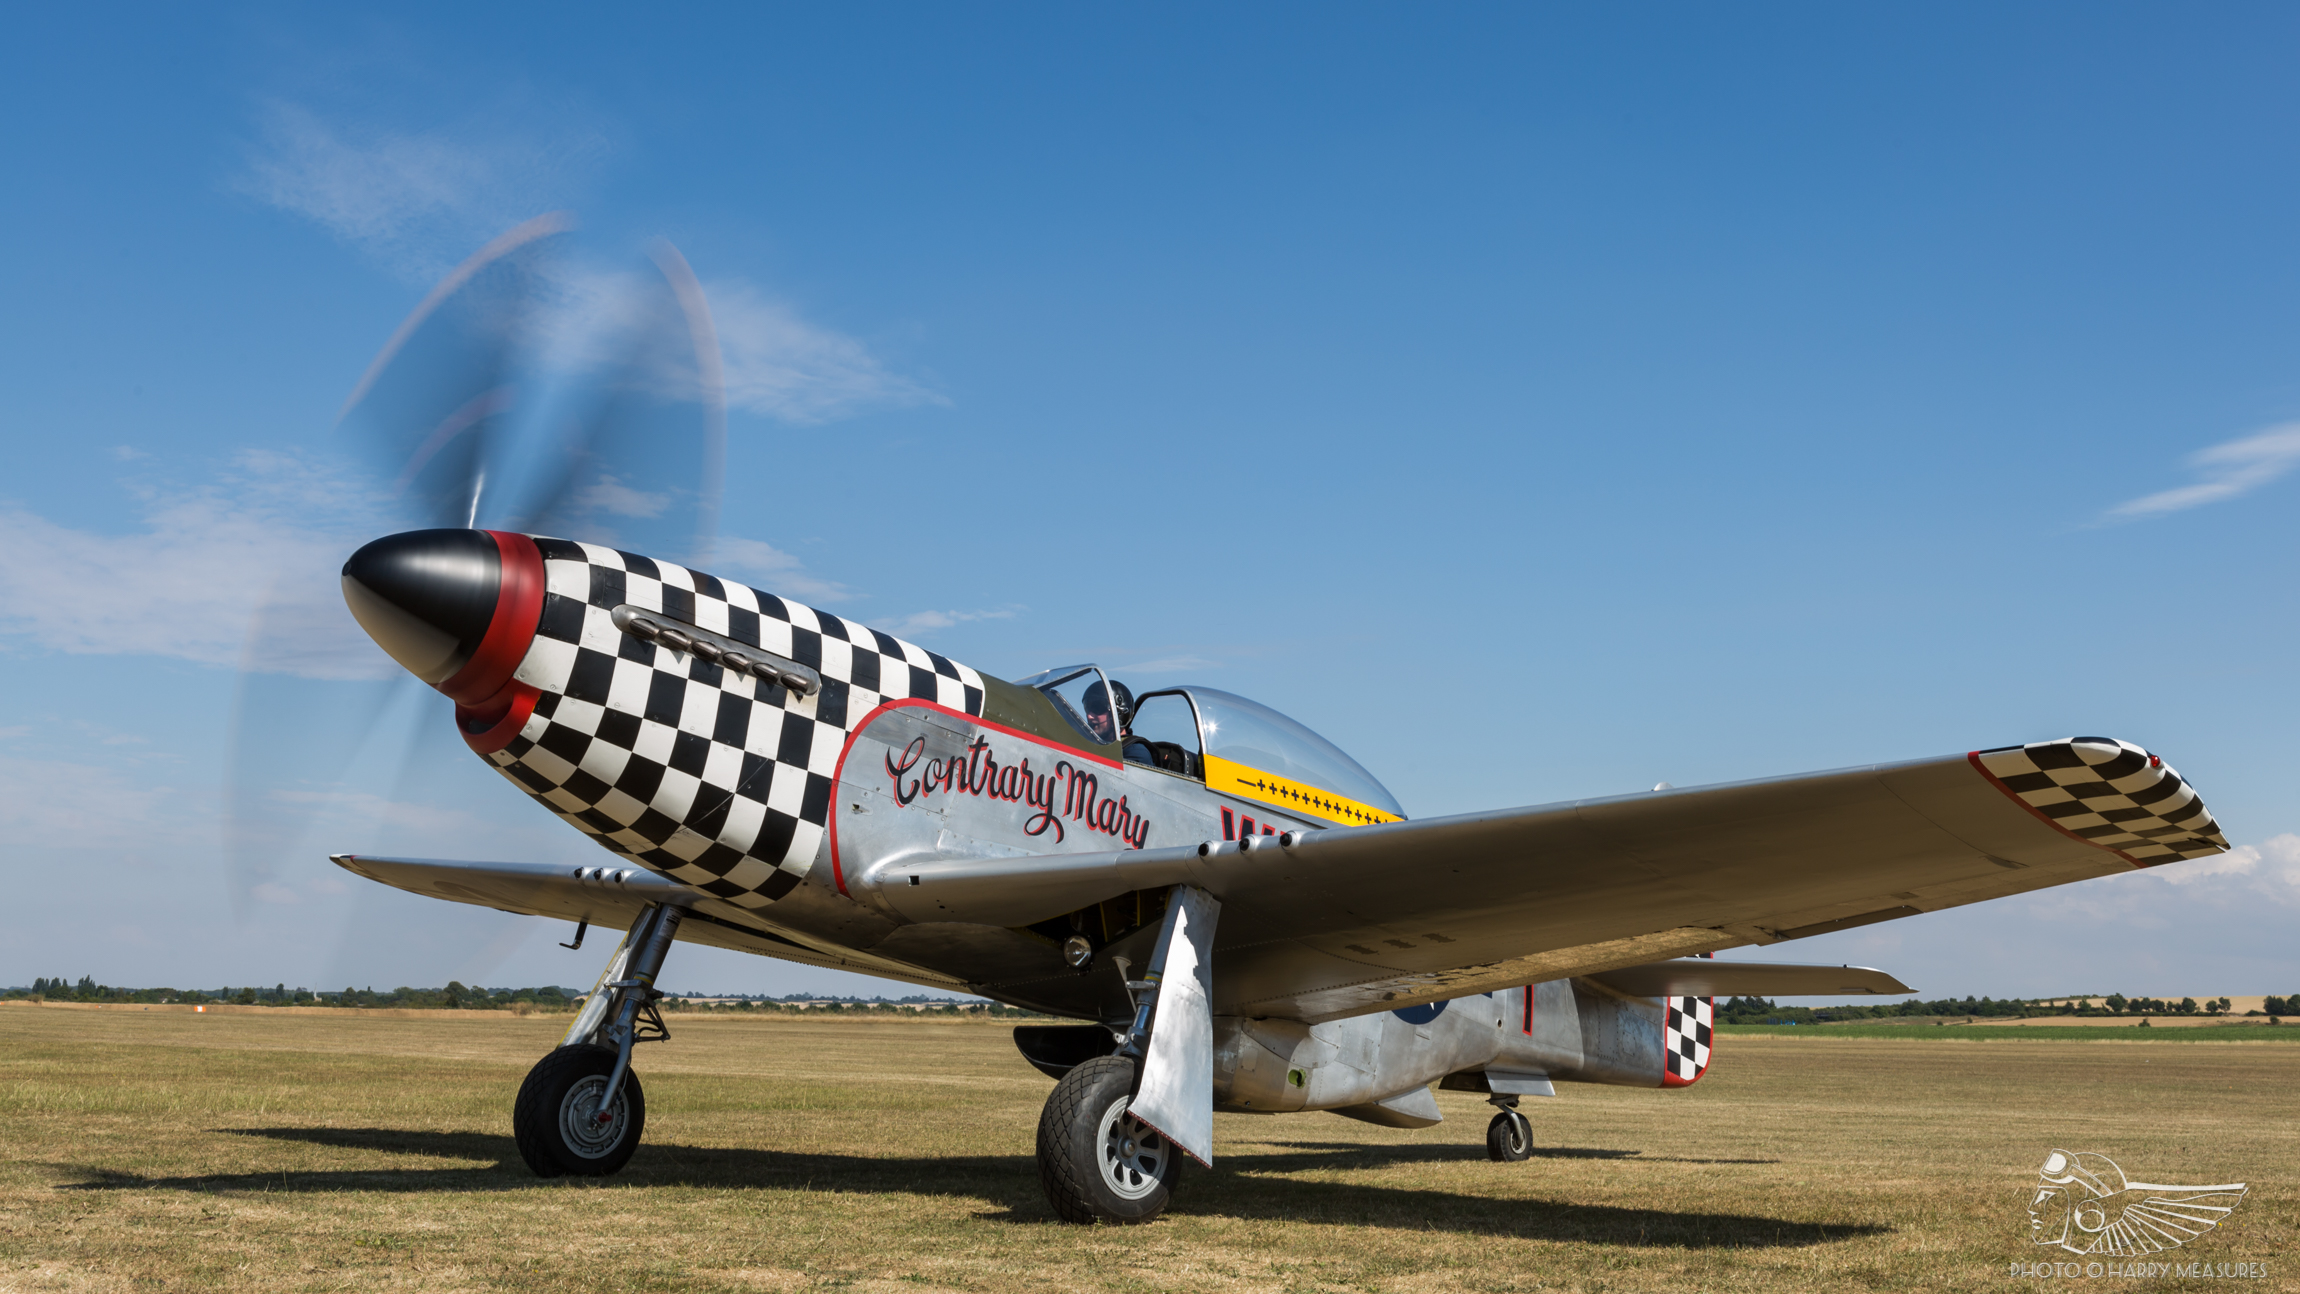
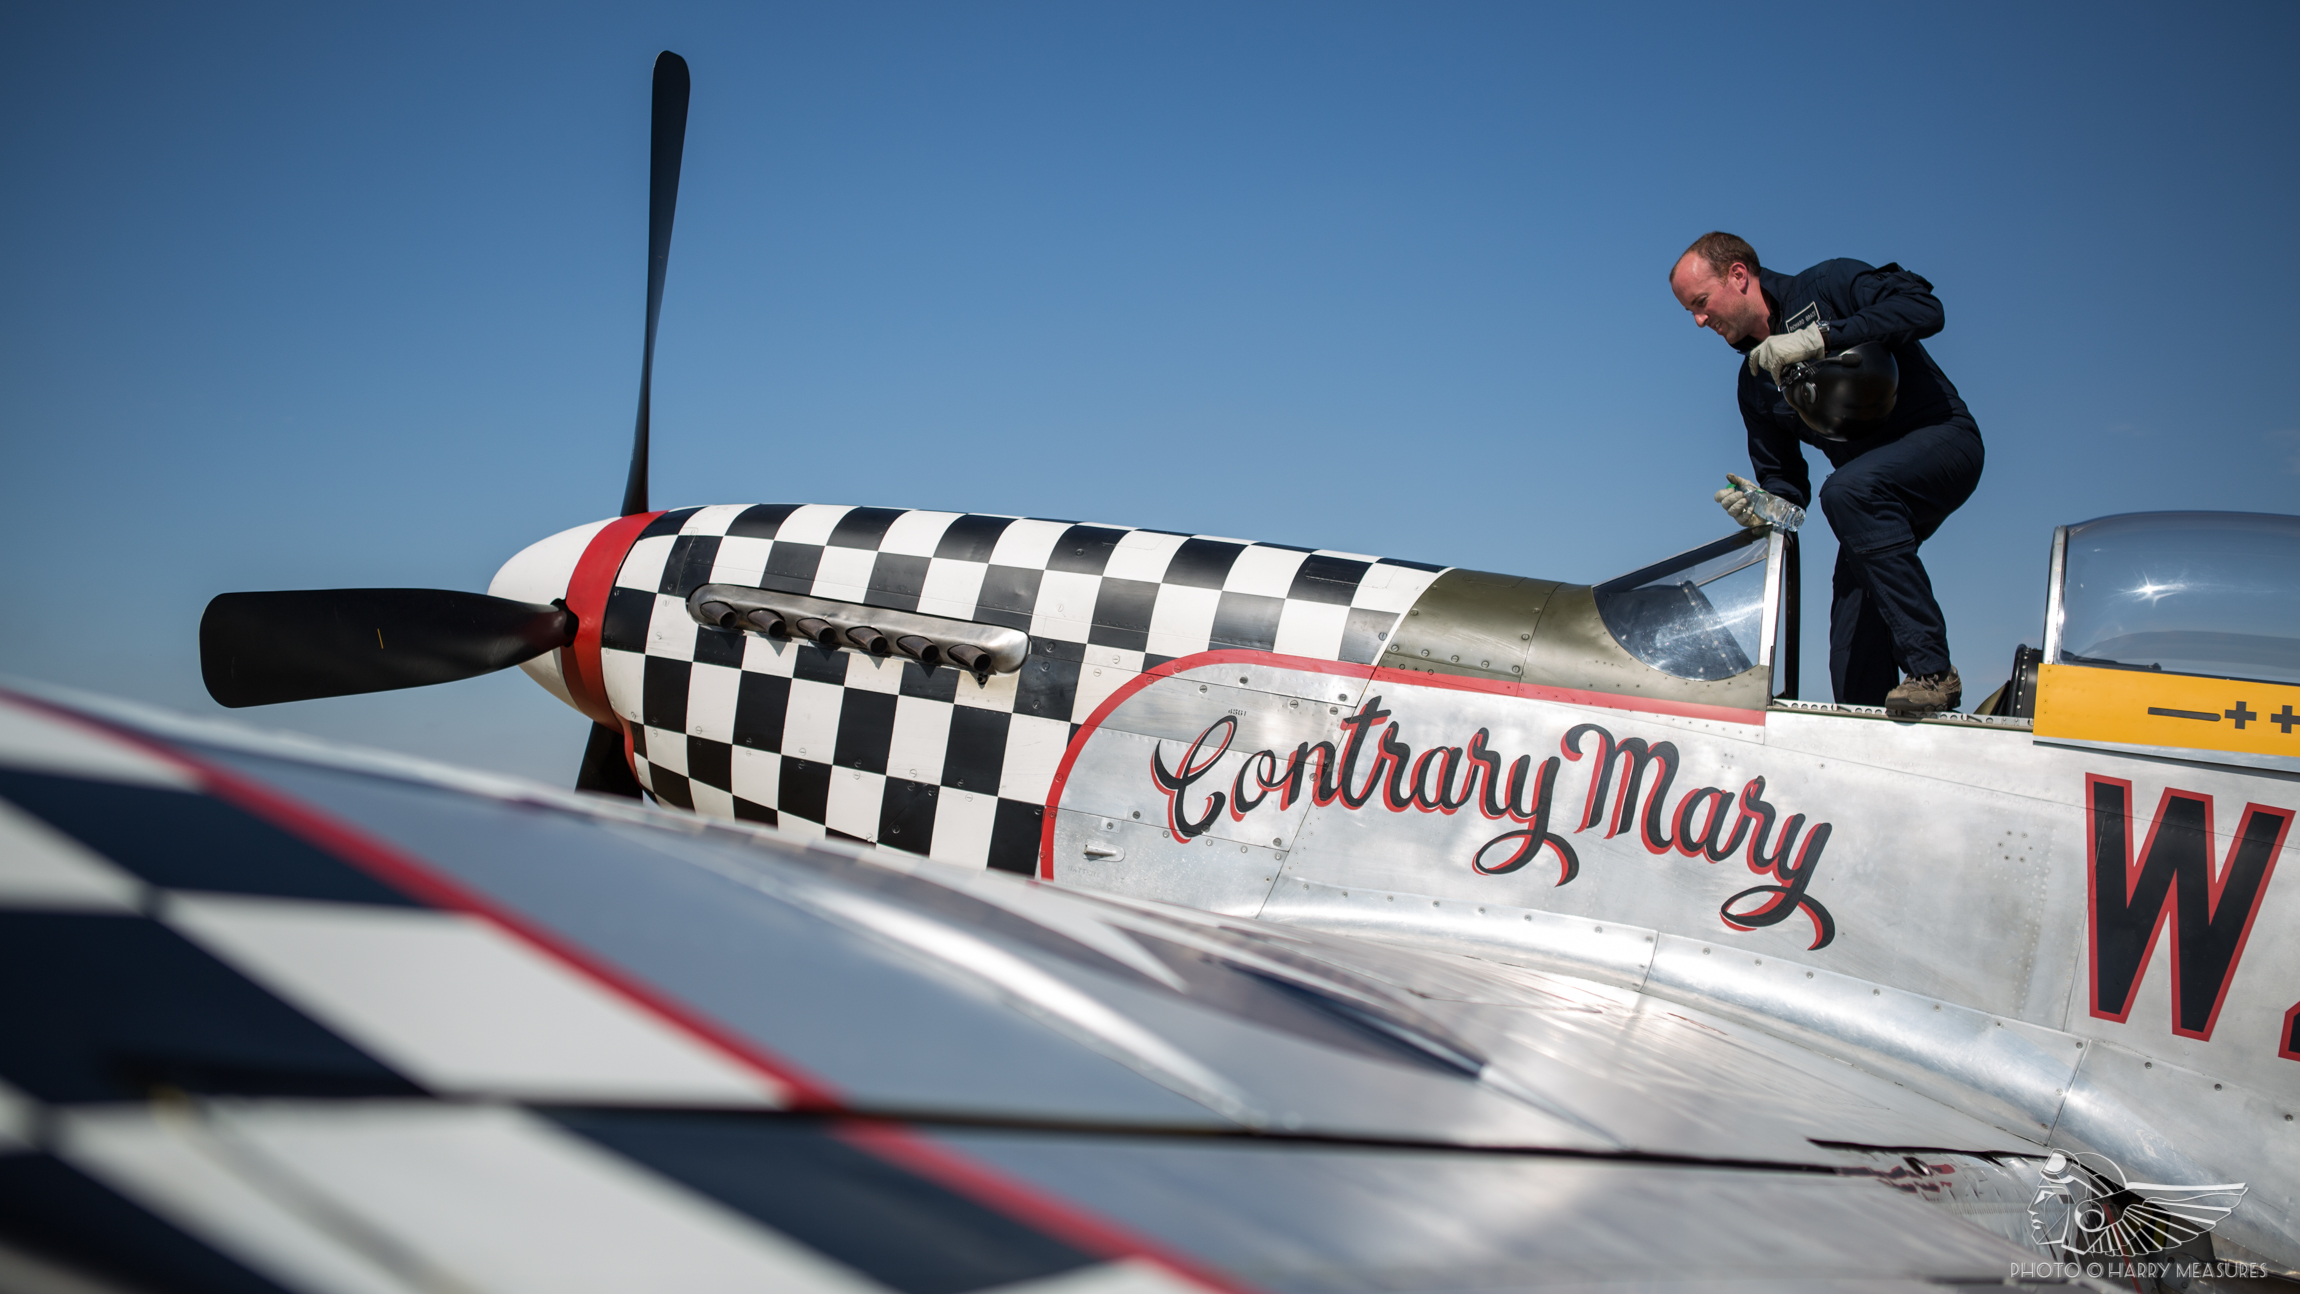
The final part of the project was to finish some details such as the half black and half white spinner (thanks to Steve K) and, not least, for Alec to apply his much anticipated Contrary Mary name on the port fuselage side. I think he probably painted it on ten times in his head before starting the actual setting out and two coat application on the aircraft itself – and true to his reputation, the finished result is a truly faithful reproduction of the original. Such is the rapid pace of work at Air Leasing, the aircraft was certified and ready for test flying before the name was complete so Alec was pulled off the wing and the first flight undertaken by Pete Kynsey with a little red paint missing from ‘Mary’! The nose chequers happily all lined up perfectly and the overall finished result is a testament to a lot of very hard work by the entire team at Air Leasing and Warbird Colour – I am sure everyone agrees that the superb air to air photos subsequently taken by John Dibbs speak for themselves.
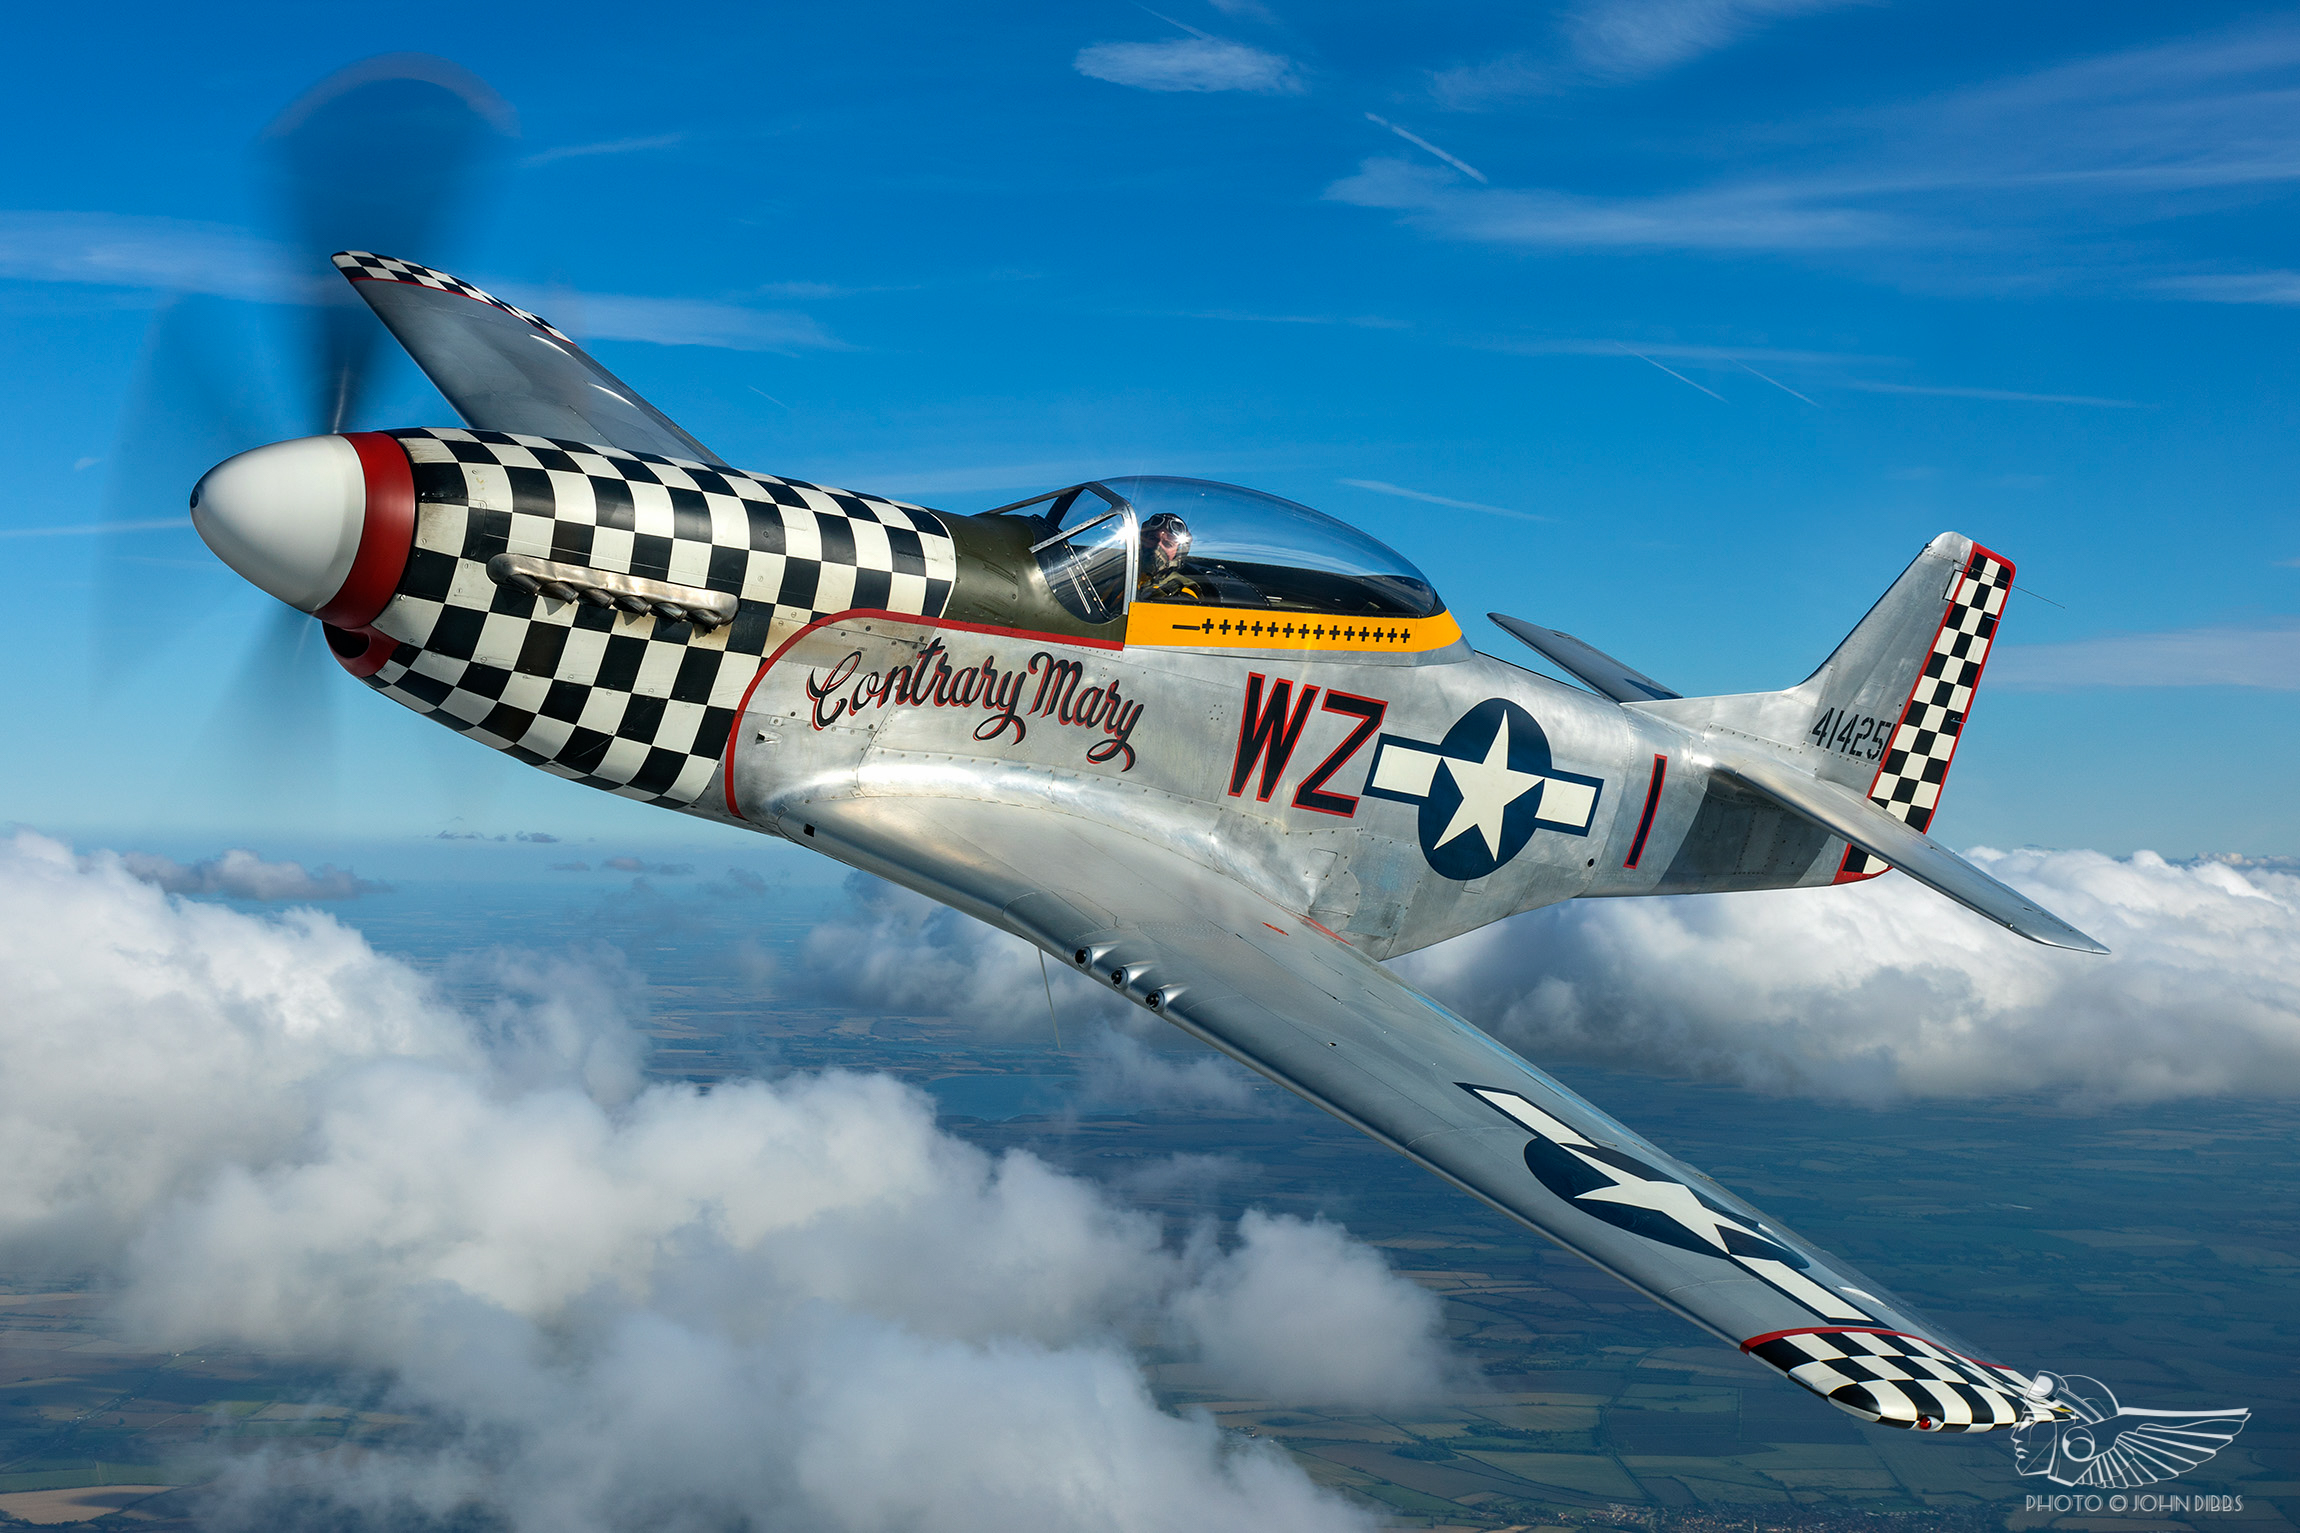
Contrary Mary made her debut, as planned, at Flying Legends 2018 – a tight deadline but mission accomplished!
Passenger rides in Contrary Mary and other Second World War fighters are available through Ultimate Warbird Flights at Sywell.
![]()